
This is part 1 of a series of posts about building an Apple-1 reproduction in 2024. See also:
- Building an Apple-1 Reproduction in 2024 - Part 2: Power Supply
- Building an Apple-1 Reproduction in 2024 - Part 3: The Retro Chip Tester
- Building an Apple-1 Reproduction in 2024 - Part 4: Assembly
- Building an Apple-1 Reproduction in 2024 - Part 5: Monitor, Keyboard, Power-Up
- Building an Apple-1 Reproduction in 2024/2025 - Part 6: C Programming
- Building an Apple-1 Reproduction in 2024/2025 - Part 7: The Audio Cassette Adapter
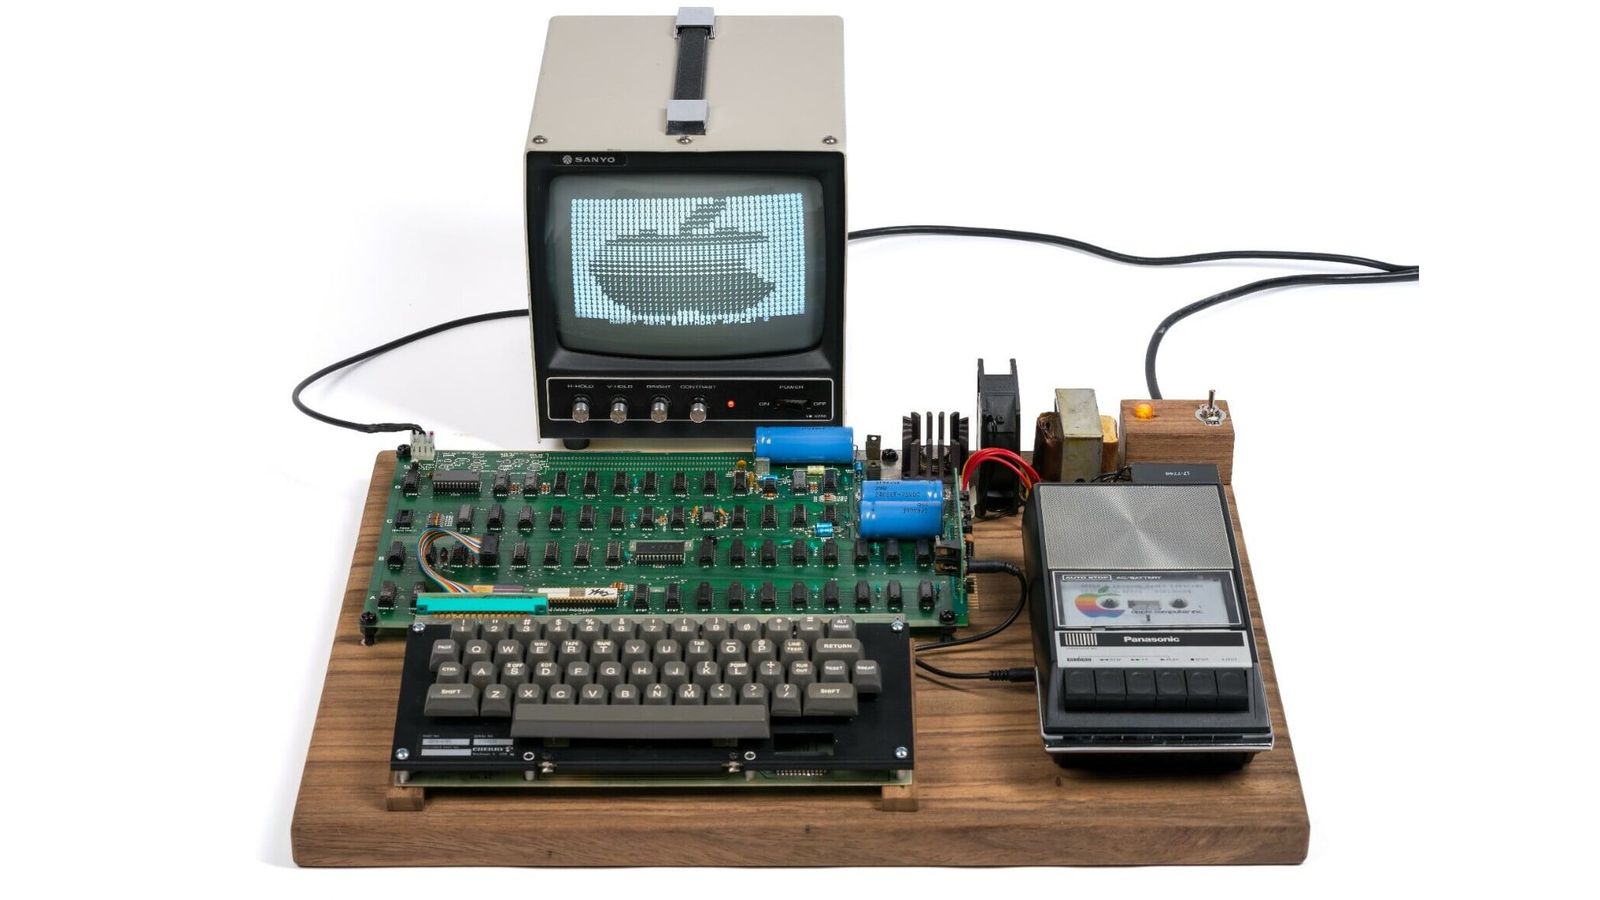
The Apple-1
The Apple-1 doesn’t need much of an introduction anymore: it is an iconic computer, the first made and sold by Apple (then the Apple Computer Company) for a short period of time of about a year beginning in 1976, until the extraordinarily successful Apple II was released. This first Apple-branded product, designed by Steve Wozniak and marketed (and partially assembled) by Steve Jobs, sold only about 175 units of 200 made. Although it was a very simple computer, one of its novelties was that it included electronics for the keyboard and video terminal on the same board.1
“The Apple-1 wasn’t designed as a Wozniak computer: it was a Wozniak terminal for the Arpanet - modified into a computer a little, but not really designed as a computer.” -Woz, 2023, on Steve-O’s Wild Ride!
The Apple-1 was sold as an assembled motherboard, and did not include a standard case or accessories, except for cases made by the Byte Shop, a local computer shop that was instrumental and getting the Apple-1 started. You might have had to provide your own case, keyboard, monitor (TV), and later storage in the form of a tape player. In short, it was a machine for enthusiasts and hobbyists. Most of the surviving Apple-1s do look like hobbyist machines.
The computer was not exactly cheap at $666.66 in 1976, which is about $3,000 in 2024 dollars, but that was a bargain compared to anything else on the market. An original Apple-1 like the “Schlumberger #2” depicted above will set you back several hundred of thousand dollars if recent auctions are any indication, the records being $905,000 by the Henry Ford Museum in 2014, and $677,196 in 2022 for a broken prototype board (assume auction premiums on top in both cases).
Reproductions and PCBs
Since getting an original Apple-1 is out of the question for most mortals, enthusiasts have, since the 2000s, made reproductions,2 including:
- Steve Gabaly’s Obtronix (2005)3
- Mike Willegal’s Mimeo (2009)
- Mike Newton’s (or Mike Ng’s) Newton-1 (2012)
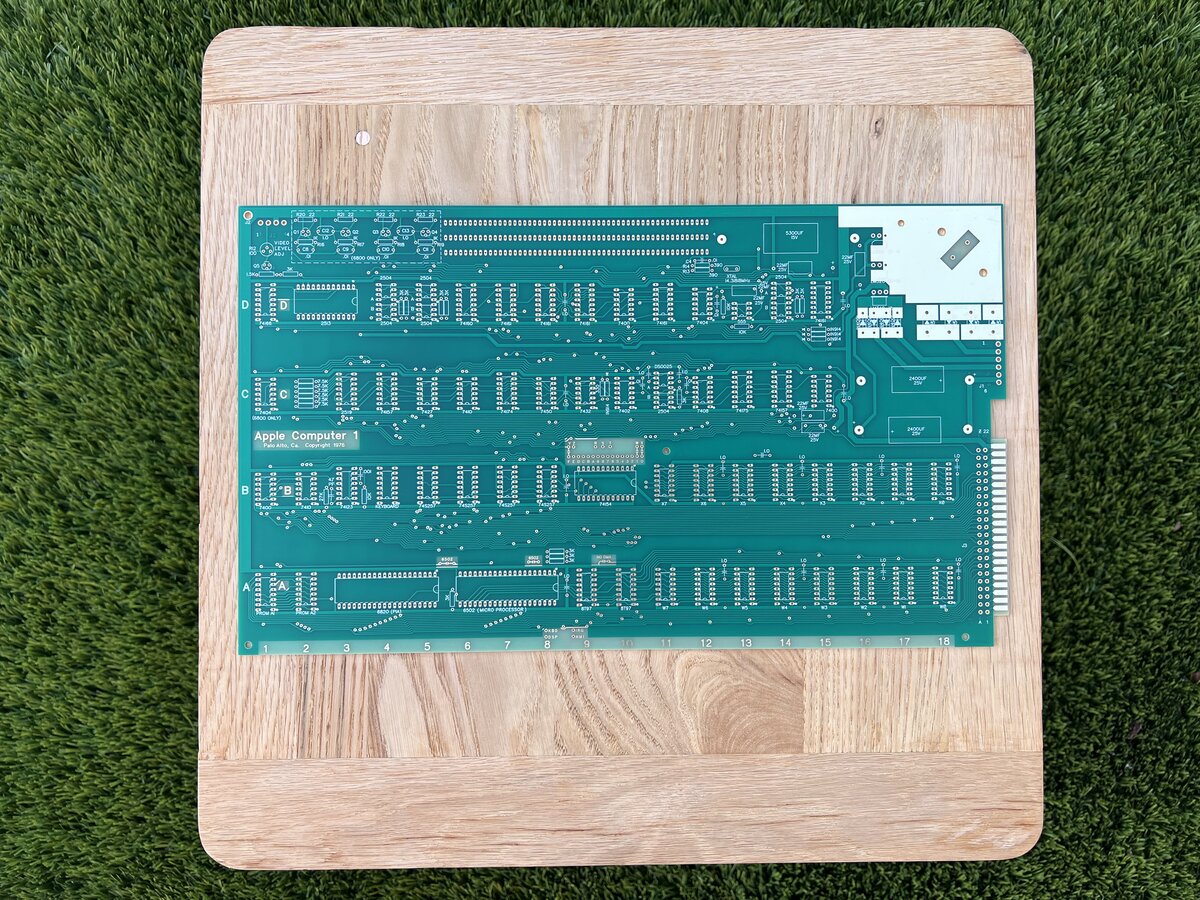
A huge part of the job was to recreate the PCB, and I believe that Mike Willegal was the first to do that. It appears that Mike Ng also did his own replica of the layout.
Projects that reproduce the spirit of the Apple-1 were also produced, including:
How I got started
Lately, Apple-1 replica PCBs (printed circuit boards) have become more commoditized, thanks to the availability of Gerber files. On a whim, in 2023, I bought a PCB on eBay from Armin in Germany, and only after the fact did I start thinking about what it would take to actually build the computer. That wasn’t the wisest strategy, and I soon realized that there is more to this project than I initially imagined!
I learned after the fact that the PCB layout is based on public Gerber files, but carefully modified by Logan Greer to match the original Apple-1 PCB closely.
Indeed, as of 2024, it is both easier and harder than before to build a reproduction:
- It is easier because the PCBs are available and information online, in forums in particular, is abundant.
- It is harder because some of the components are harder to find or significantly more expensive, and kits4 are no longer available mainly for that reason.
As of September 2024, you can still buy fully-assembled replicas on eBay, but they are expensive, and for me that is not the point of the exercise anyway.
I should mention that there are options for the PCB: the one I bought from Armin is a fairly affordable ENIG (Electroless Nickel Immersion Gold) PCB, and the look of it is definitely not authentic. I realized later that for about double the amount I could have bought from him a higher-quality, silver-colored PCB. Some very knowledgeable people in online forums recommend the more pricey ones, but for better or for worse, I have decided to stay with the PCB I had. Some arguments in favor of staying with it:
- The edge connector plating is not going to be as robust as it could be, but it is unlikely that this connector will see many cycles of insertion/removal.
- The ENIG process gives unmasked areas of the PCB a gold color. However, I had already decided to use machined IC sockets, which are not period-correct either, and the ones I got happened to be also gold-plated. I realize I could have gone for silver on silver as well, had I made different initial choices.
So my build is doubling down on the “gold” look, which in itself is quite nice, although clearly inauthentic.
The quest for authenticity
One question I asked myself briefly at the start was whether I wanted the look to be as authentic as possible or not. I know that some people search (or used to search) for period-correct chips with the appropriate date codes, for example. How much money and effort you spend towards this goal is of course a matter of preference, but to me this makes the most sense if you are fixing an original Apple-1, and less sense if you are building a reproduction. Some have even gone as far as updating date codes on chips to make them look more authentic. This seems questionable to me: not only do I not understand the point of this, but there is a high potential for confusion if not deceit here.
In any case, I decided that I wouldn’t be picky and that I would only care mildly about authenticity. I am mainly interested in getting the machine to look good and to work. It is entirely acceptable for me if it is obvious that it is a reproduction. I have no intention of fooling anybody or participate in a contest. This said, I want to do a decent job, and I am selecting parts that look close to the originals when possible (like the iconic Sprague capacitors, the sinterglass diodes, some resistors and capacitors, etc.), even though that means spending a little more.
The search for parts
In the absence of kits, finding all the parts is possibly the most daunting aspect of the project.
I started by asking questions in the Apple Fritter forums to get help. Answers confirmed that the parts I thought difficult to source or pricey are indeed difficult to source or pricey!
There are several categories of parts:
- Available new parts that look like the original ones:
- Molex connectors, some diodes, transistors
- blue Sprague capacitors
- linear transformers (of the Triad brand, one of Apple’s recommended brands with Stancor)
- Easy to find modern parts that don’t look like the original parts but work:
- resistors, capacitors, diodes
- IC sockets
- Vintage parts with some remaining sources online (eBay) or offline (electronics stores):
- 6502 CPU
- 6820 PIA
- 7400-series chips, disc capacitors (Unicorn Electronics, Anchor Electronics)
- Vintage parts which may or may not be available from very few sources, if not a single source online (typically eBay):
- memory chips
- shift registers (including the infamous Signetics 2519)
- clock chips
- PROMs
- Parts that look period-correct but can be sourced on eBay with some patience and budget:
- Allen Bradley resistors
- A14F diodes
I have yet to add up the exact total cost, but I paid between $800 and $1,000 for the PCB and components, keeping in mind that I will end up with spare parts (extra resistors, capacitors, diodes, etc.).
Specific components
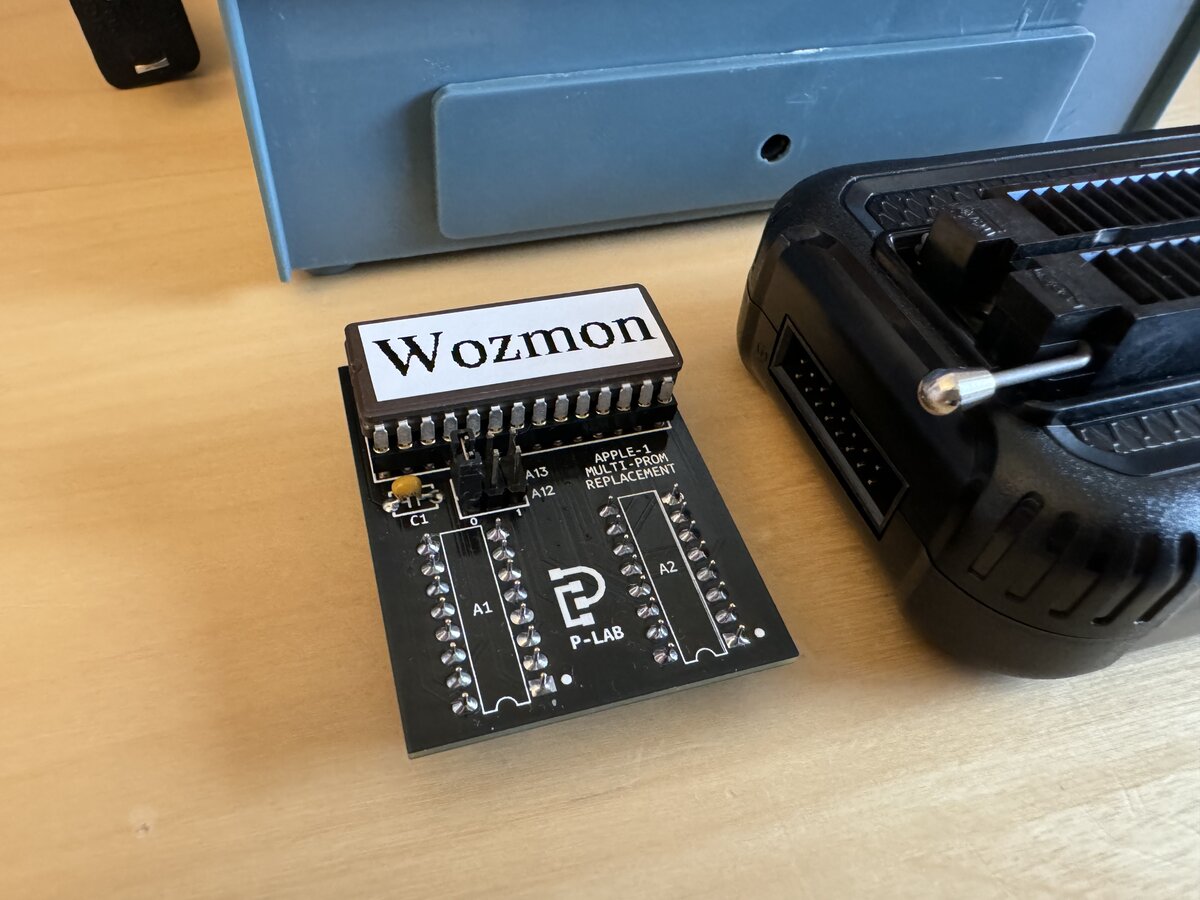
The Signetics 2519 replacement
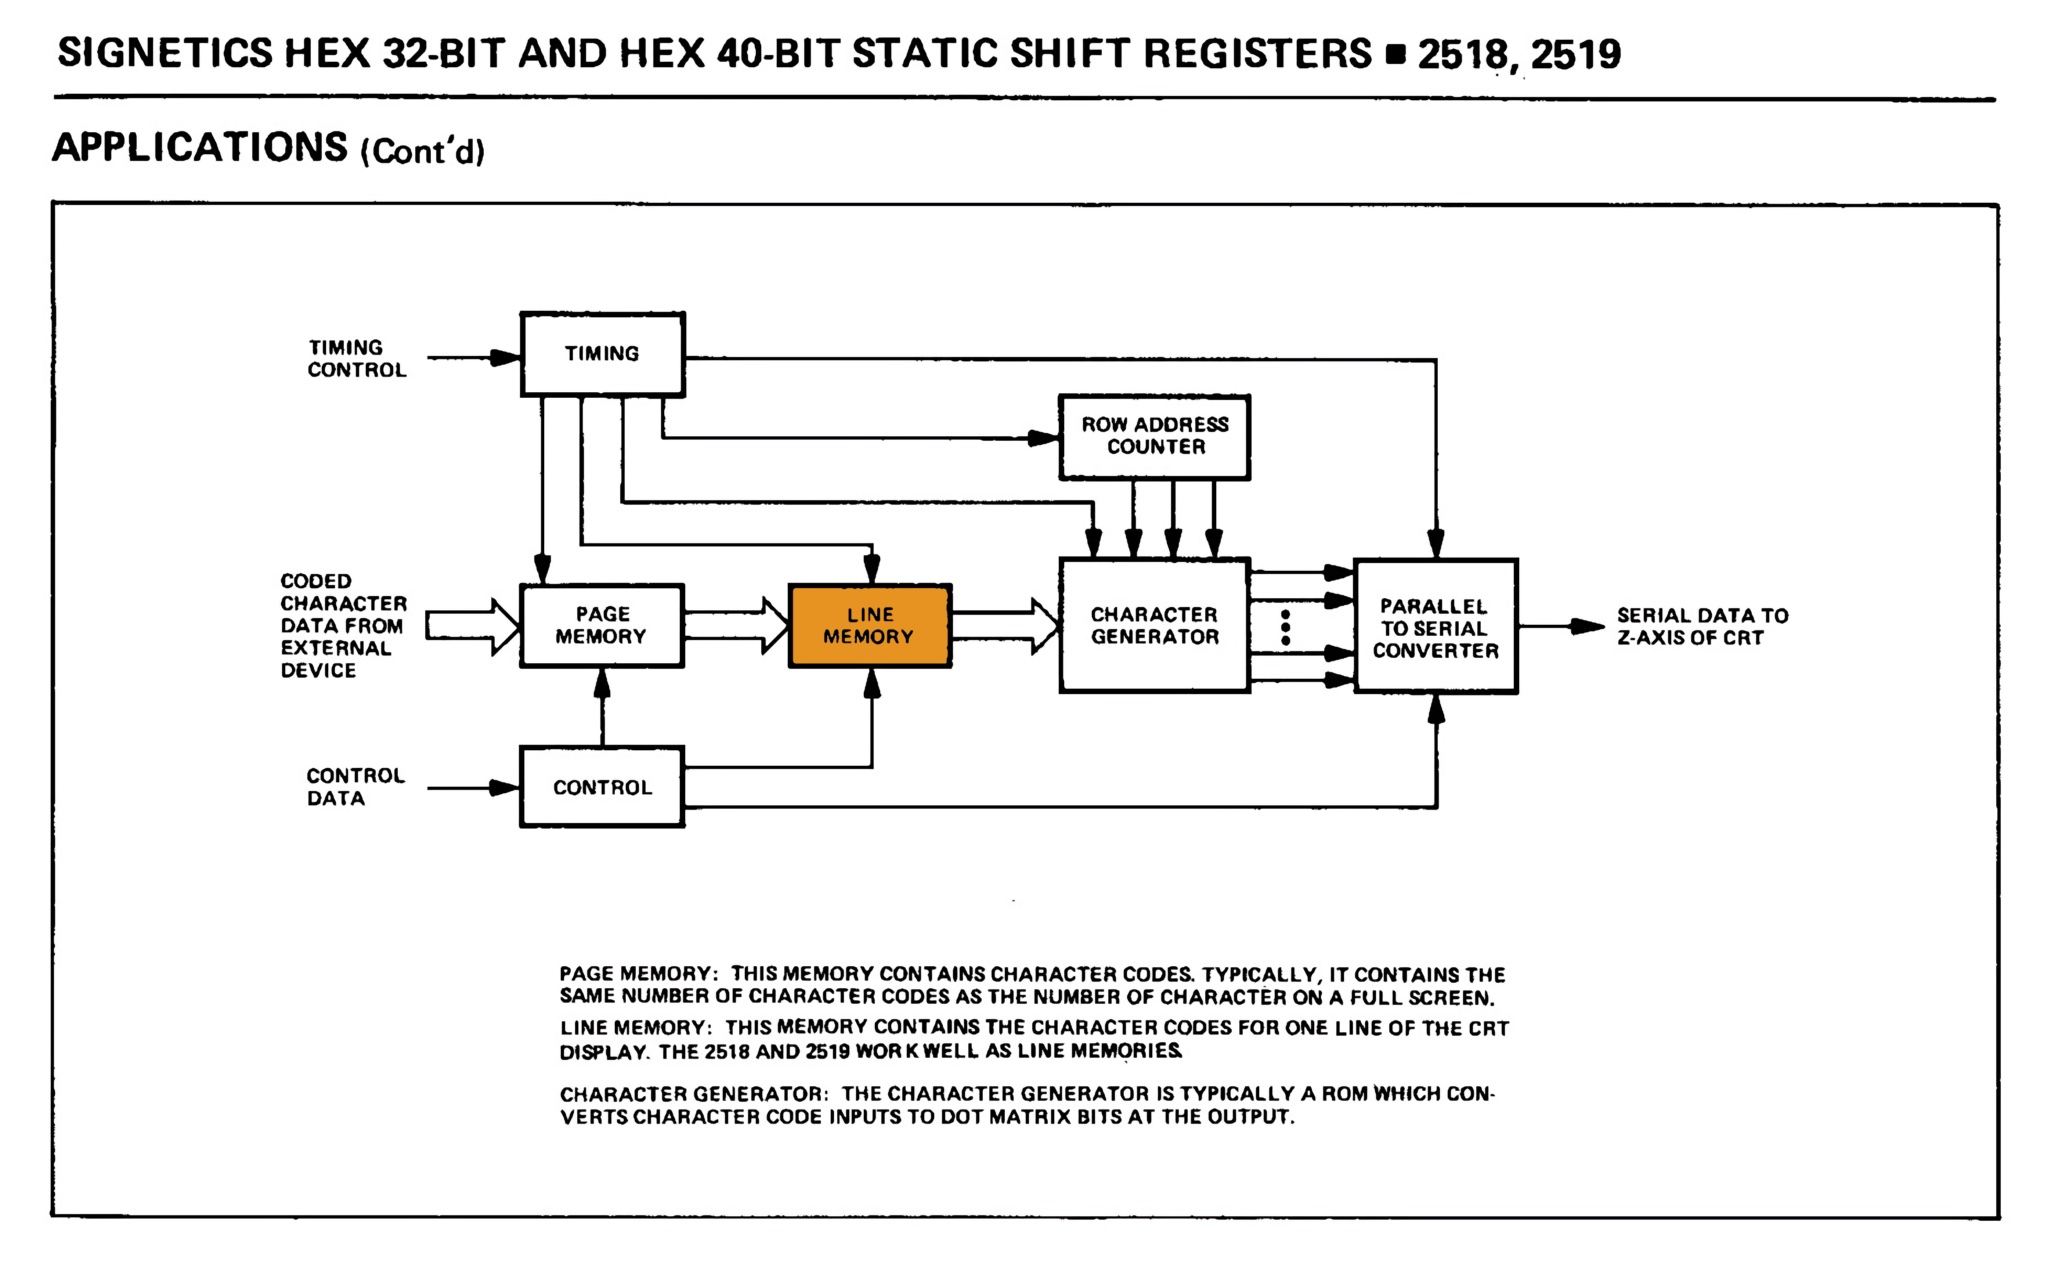
The Signetics 2519 is part of the terminal section of the Apple-1. Specifically, it buffers all the characters in the current line to be displayed. This is known as “row” or “line” memory. In fact, the data sheet for the 2519 lists this as the main application for the chip.
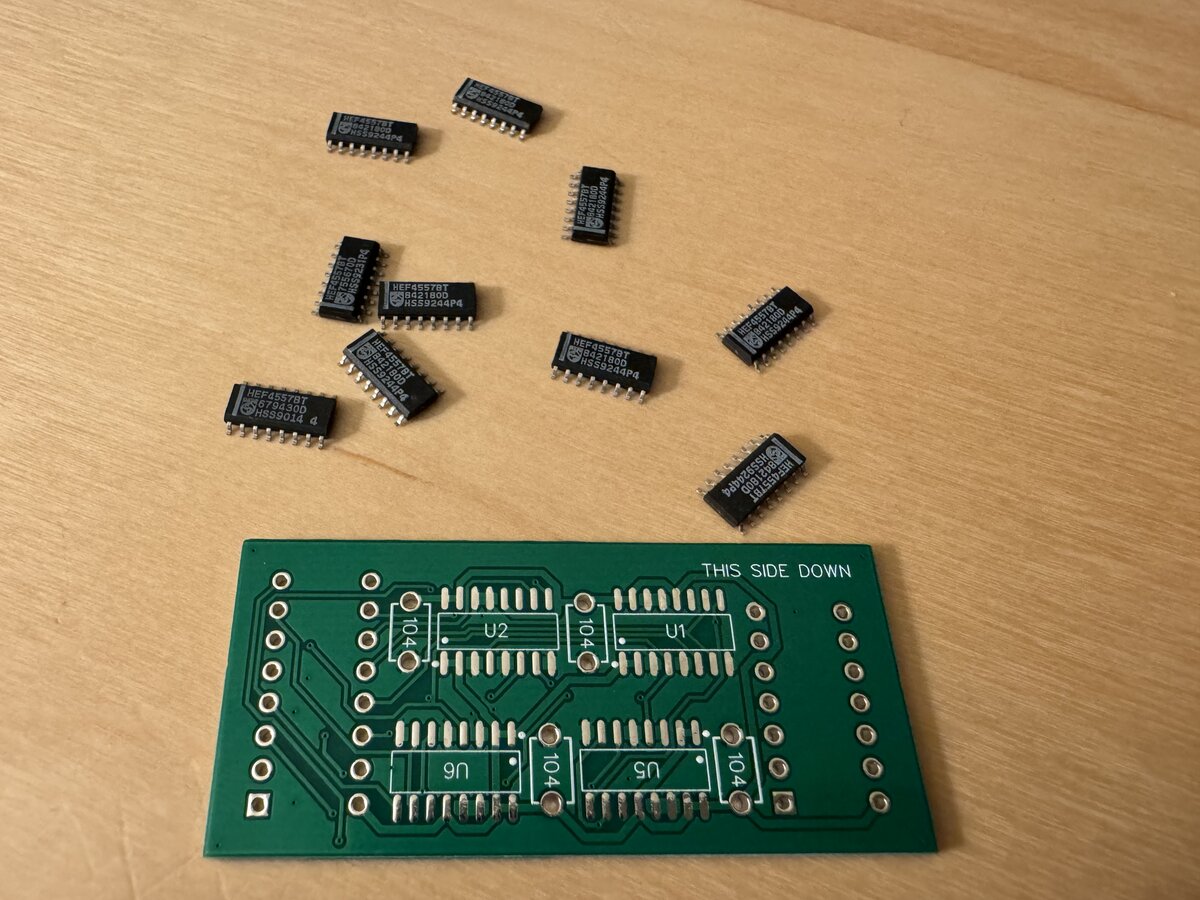
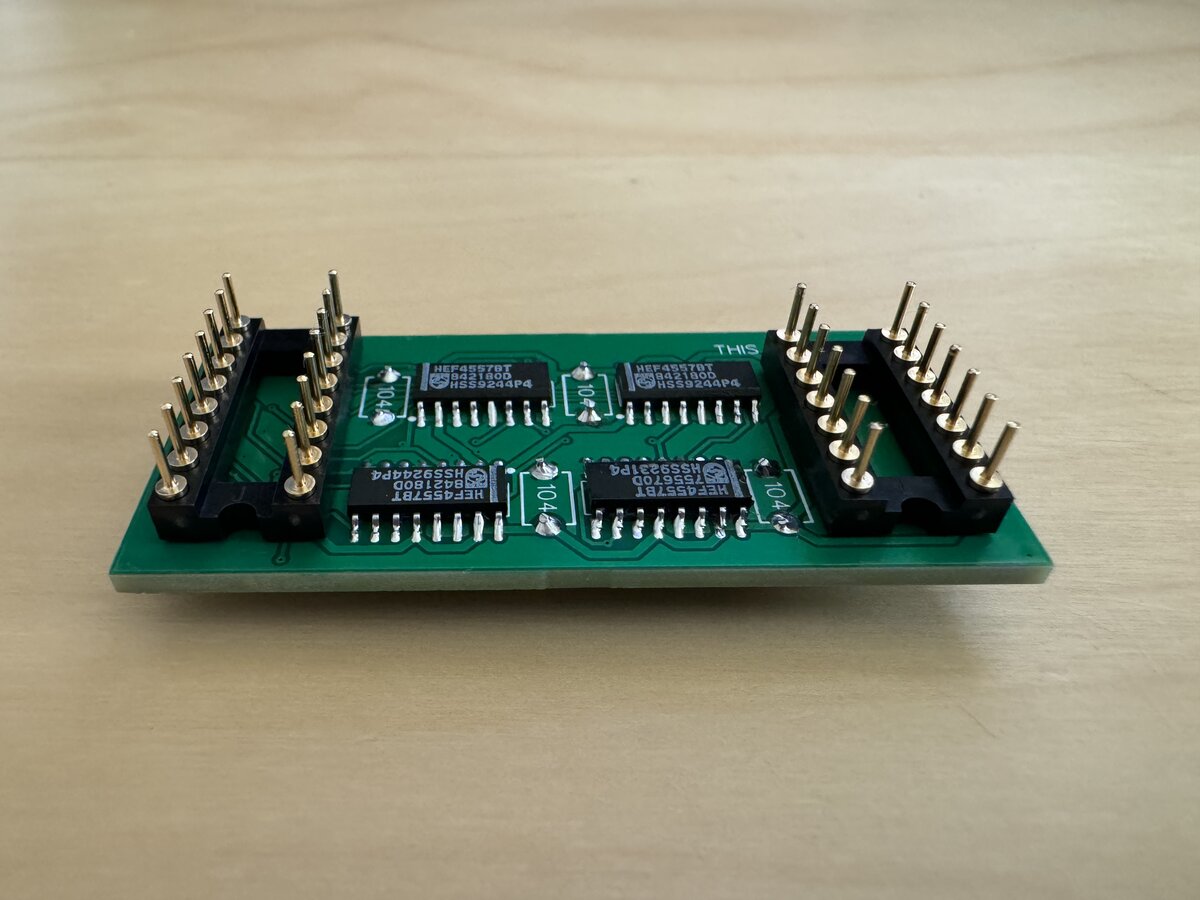
By modern standards, this is an extraordinarily simple chip. However, it has only a single source right now (and I think that this has been the case for a very long time). With shipping, that single chip would cost me $80. I decided that this was “too much”. Luckily, smart people (Natas and Claudio AKA P-LAB) designed a replacement daughter board for the 2519. This won’t be original, but it will work, and it doesn’t stop me, should I ever get an original chip, to replace the daughter board with it:
I ordered 5 SMD and 5 through-hole PCBs for a grand total of $6 shipped!
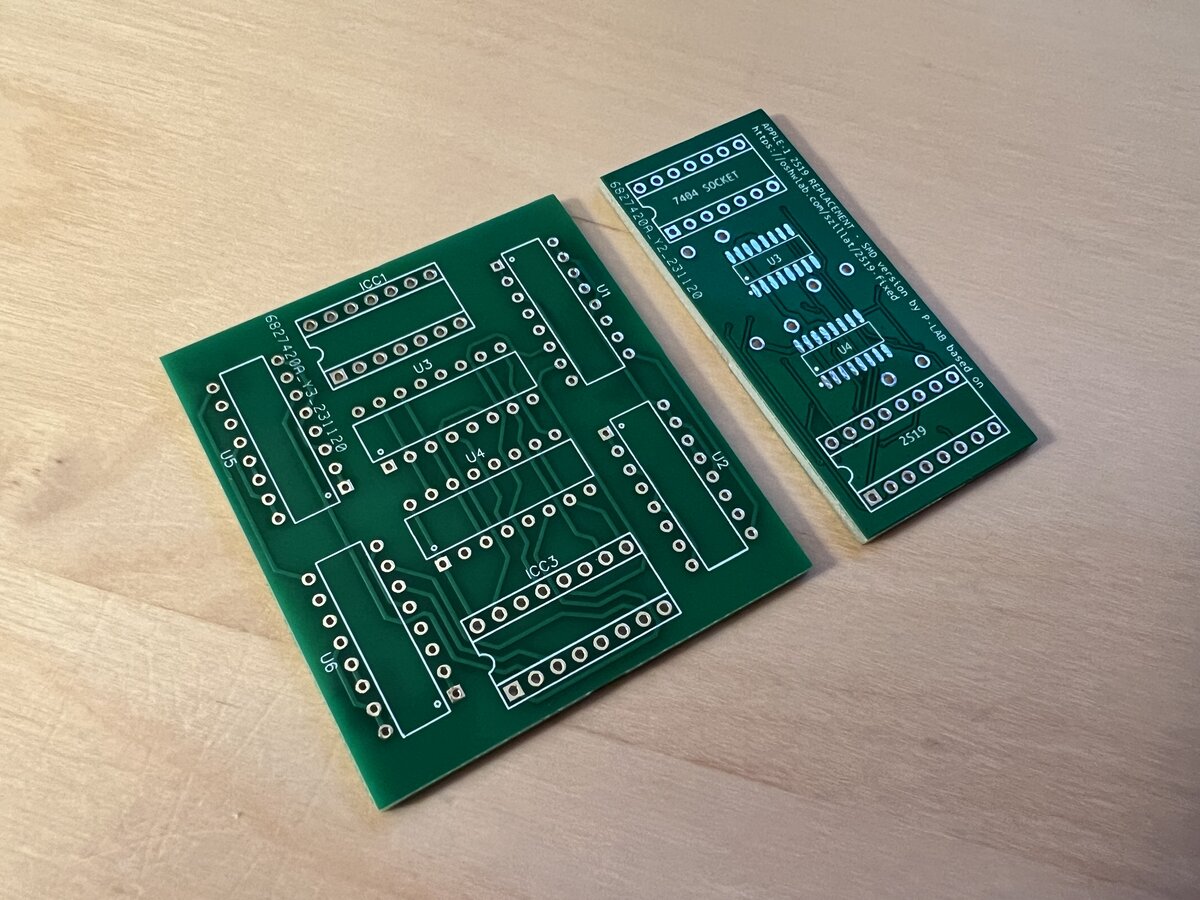
But then I found that the more modern HEF4557 shift-register chips were not available in either package: the DIP format is obsolete, and the SOIC-16 is replaced with a SOIC-16 Wide package! Luckily, I found a batch of 10 Philips HEF4557BT chips on eBay. If for some reason that doesn’t work I will have to order an updated version of the PCB for the SOIC-16 Wide footprint.5
The reason I had also ordered through-hole boards is that I thought that would be much easier to solder, and I could have switched to the SMD version later.
Now why do we need 6 “modern” chips, while there was only on original? The 2519 is a “hex” (6 inputs, 6 outputs) 40-bit shift register. The 16-pin chip has:
- 6 inputs
- 6 outputs
- VCC and GND (VGG)
- clock
- recirculate

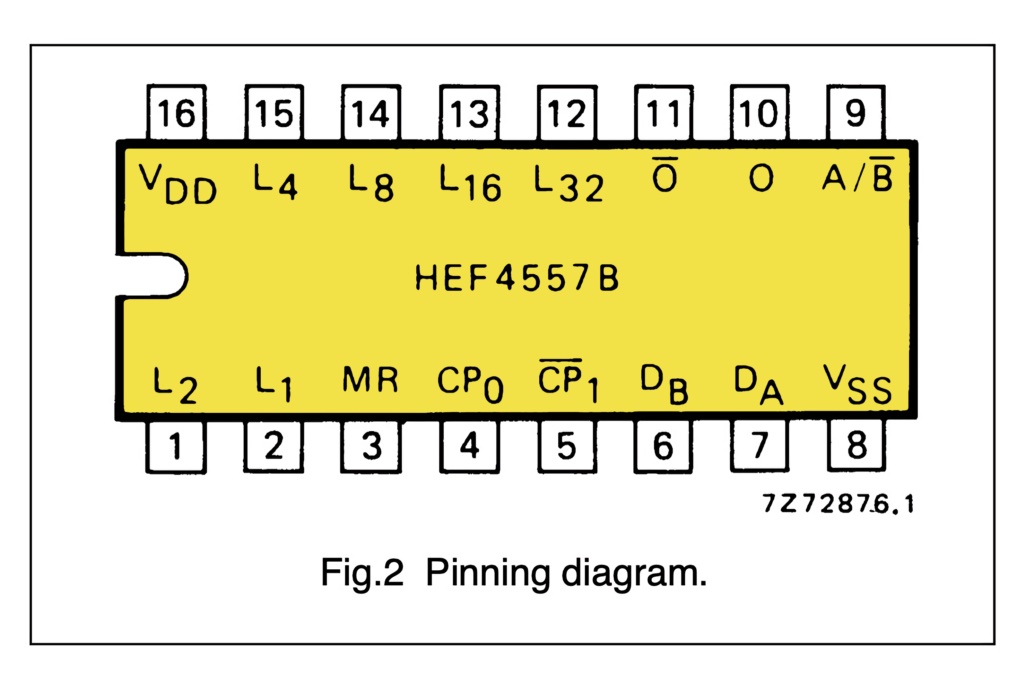
The replacement HEF4557BT is a slightly different beast, because its buffer size is configurable from 1 to 64 bits. This means that 6 of its pins are dedicated to this configuration. So we have:
- 6 configuration inputs
- 2 selectable data inputs (DA and DB)
- 1 data input selector (A and /B), which can be used to recirculate bits
- clock
- clock enable
- output and negated output (O and /O)
- reset
- VDD and VSS
Because this needs to replace a “hex” chip, six of those HEF4557BT are needed.
I had never soldered SMD components before, and I was a bit worried about it. I watched a few videos, and it turns out that it’s not as impossible as it sounded initially. Of course, on YouTube, you will find people doing the craziest things. But I started by assembling The Three Fives Kit from Evil Mad Scientist: here you get to solder SMD resistors and transistors, and that was good practice, even though I am still a beginner at this.
This said, I wasn’t as successful with the SOIC-16 ICs, in my estimation: observing the result under a magnifying glass, I could see that the soldering was not perfect. I tried to improve it, but my confidence in the quality of the contacts remained low. It seemed that the joints were sometimes dry, often uneven, and that the ICs were a little too high, one is clearly not perfectly aligned, etc. I will have to test the board to see if it works properly. The good part is that since there are 6 bits in parallel, if I messed up one of the ICs (and therefore bits), and if I don’t have bridges, others should work. Crossing fingers.
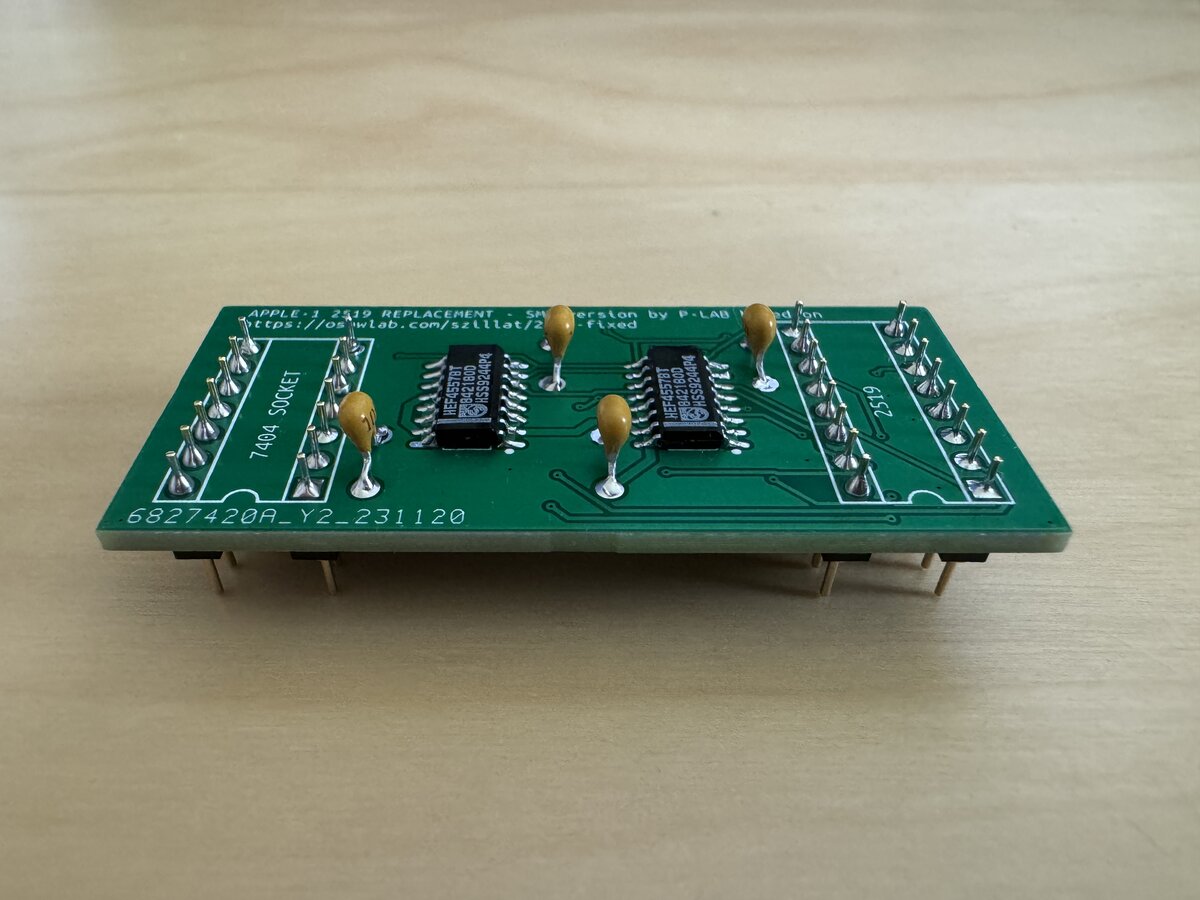
This is the bottom of the board, which plugs into the IC sockets:
DRAM chips, shift-register chips and character ROM
The Apple-1 features 8 KB of DRAM. I bought on eBay a set of 16 (but received 17, thank you!) Mostek MK4027N-4 chips, sold as tested.6 These are 4096x1 chips.
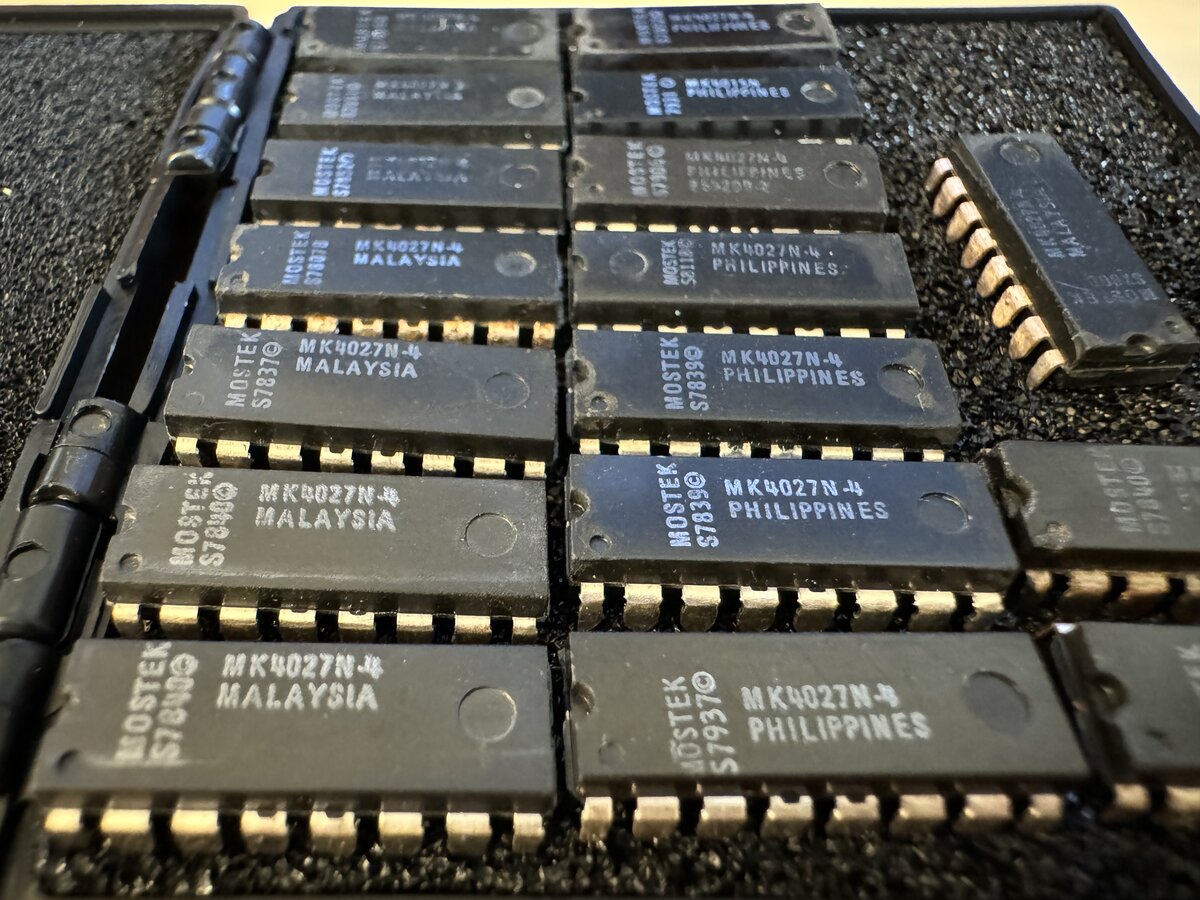
From the same seller, I got a set of 7 Signetics 2504 chips and the 2513 character ROM, again sold as tested.6
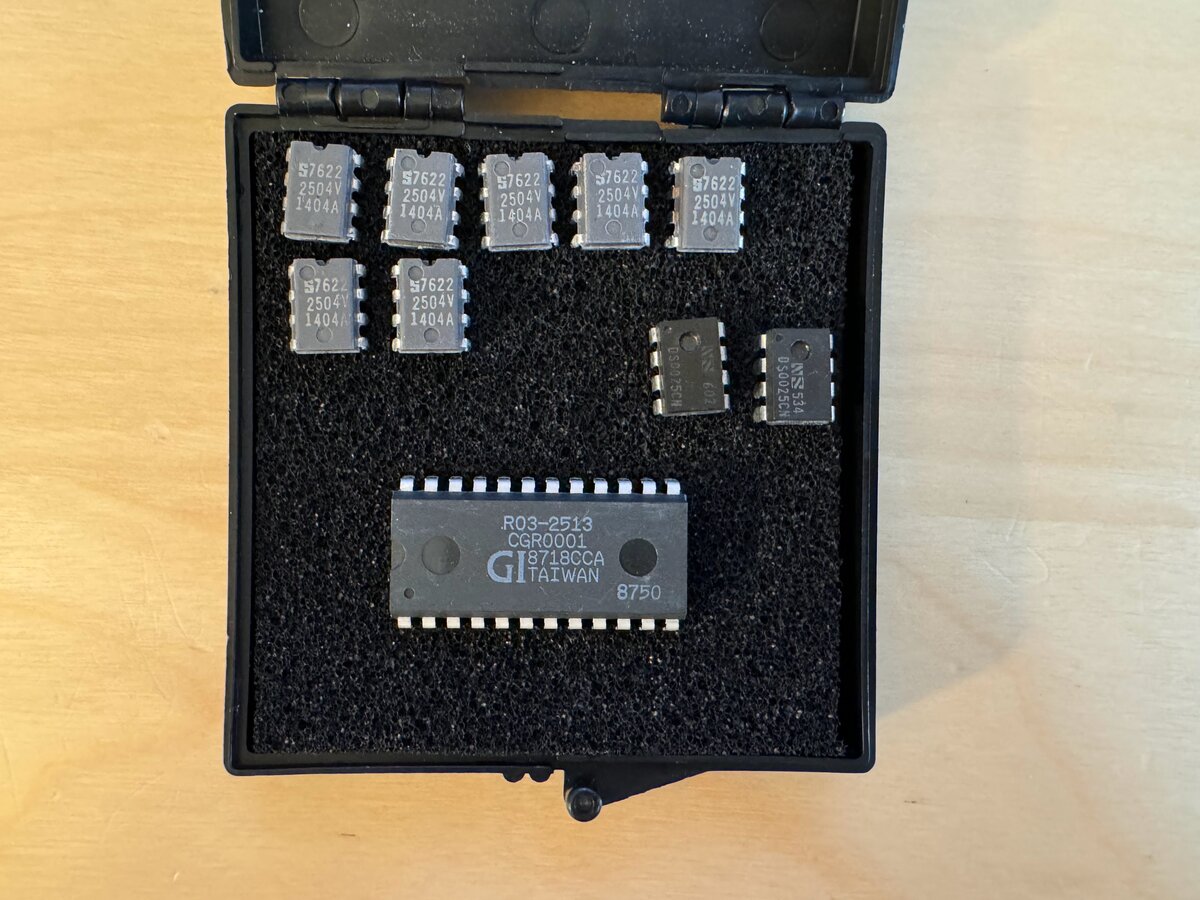
Note that the character ROM must specifically have the CGR0001 code, which describes the content needed for the Apple-1.

All in all, the chips I got from that seller cost me about $200. This is as close as it gets to being an Apple-1 “IC kit”: although it’s a small subset of the total number of chips of the computer, it is also some of the hardest and most expensive to find.
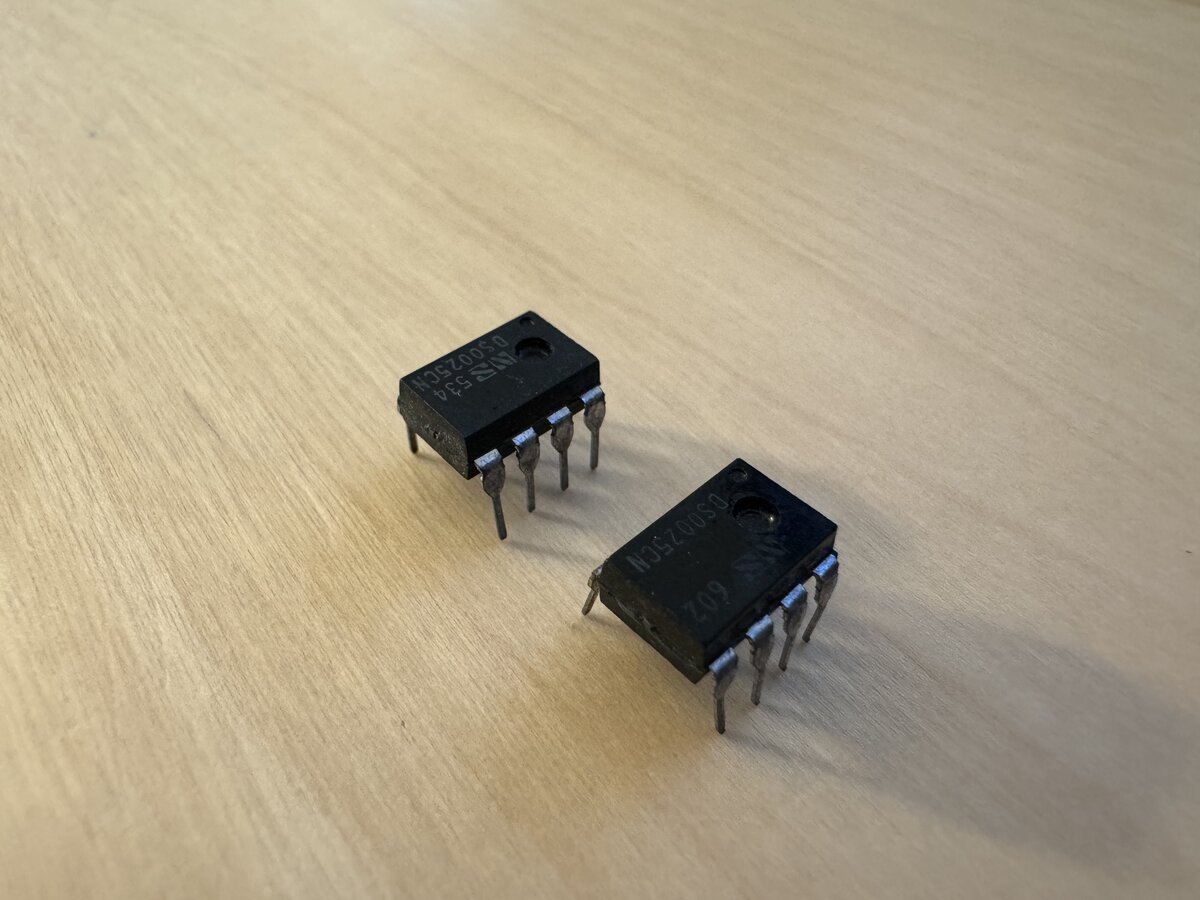
DS0025CN
This two-phase clock chip I also bought on eBay, in a lot of 2, untested.6
6820 (PIA) and 6502
The PIA in the Apple-1 is used to interface with the keyboard and the terminal section.
Those PIA chips used to be cheap and abundant, but original ones are running out. Interestingly, those PIAs are also used in old pinball machines, so they are sought after for that reason as well. But they can still be found. It appears that you can also use a 6821 chip, or a 6520.
- Some sources from China are cheap, but can you trust that they are not fake? I do note one seller who sold 80+ sets of 3 chips, so that might be a good source after all.
- A seller in Canada sells Motorola-branded 6821 chips “guaranteed to work”, which is good. With shipping, that amounts to about $15 for a chip. Not great, of course, but not crazy either.
- The CM602 made in Bulgaria might also be an option, and looks good (ceramic package) although not original. With shipping, that amounts to about $21 for a chip.
Oh, and of course someone is selling on eBay a “Lot of 7 Rare MOS MPS 6520 PIA chip used in APPLE 1 - date codes all in 1977” for $1,995. Right.
I decided, for looks and fun, to order a CM602 from Bulgaria. I don’t know if it works yet, as it was sold untested.6
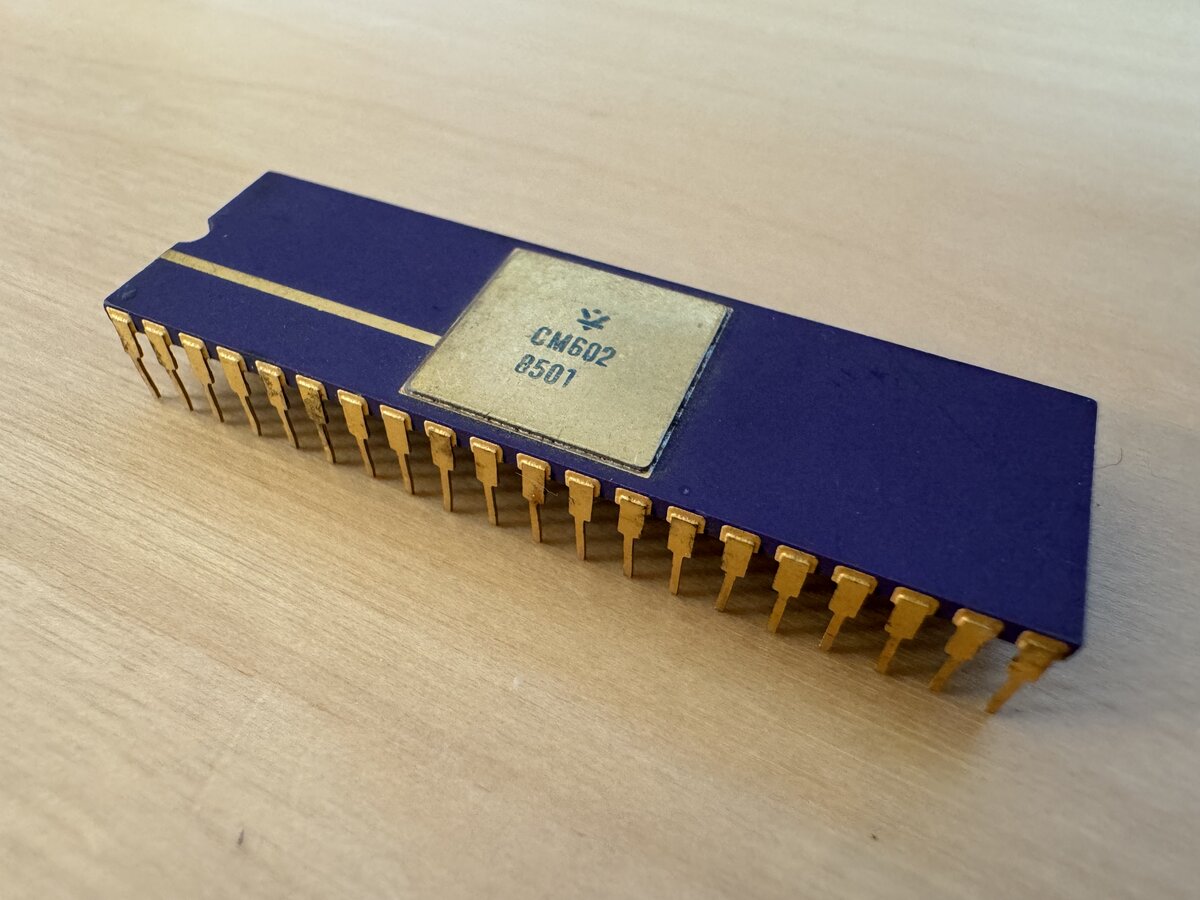
I have since learned a little about the rise and fall of Bulgaria’s semiconductor during the communist era. See The Unlikely Rise and Collapse of the Bulgarian Computer, in particular. According to the description of an eBay seller, this chip was “Made by DSO “Priborosroene Pravetz, Bulgaria”, the same factory that produced the famous Pravetz Personal Computer (Bulgarian clones of Apple-II and IBM PC/XT) during the communist era.”
Then locally I found a Synertek-branded 6520A (date code 1983) at Anchor (although they listed it as out of stock originally). Hopefully one or both will work.6
You can easily find 6502 chips on eBay. This said, I also found a Synertek-branded 6502A locally at Anchor Electronics (1979 date code).
I read that those 6520A and 6502A chips came from old Atari stock, witness the “CO” markings on the chips!
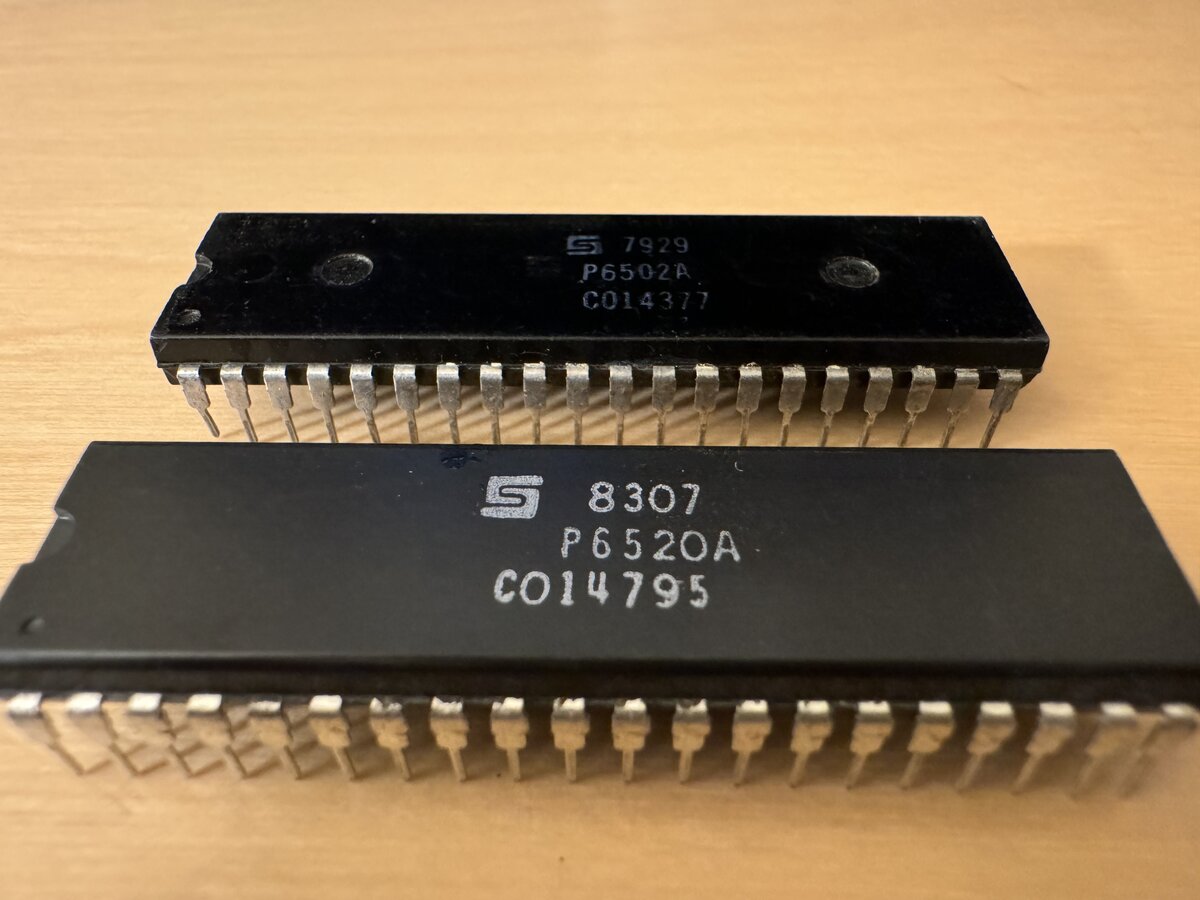
These two chips are very recognizable on the original Apple-1s, as they are the only 40-pin DIL chips, and sometimes they are in a ceramic package.
PROMs
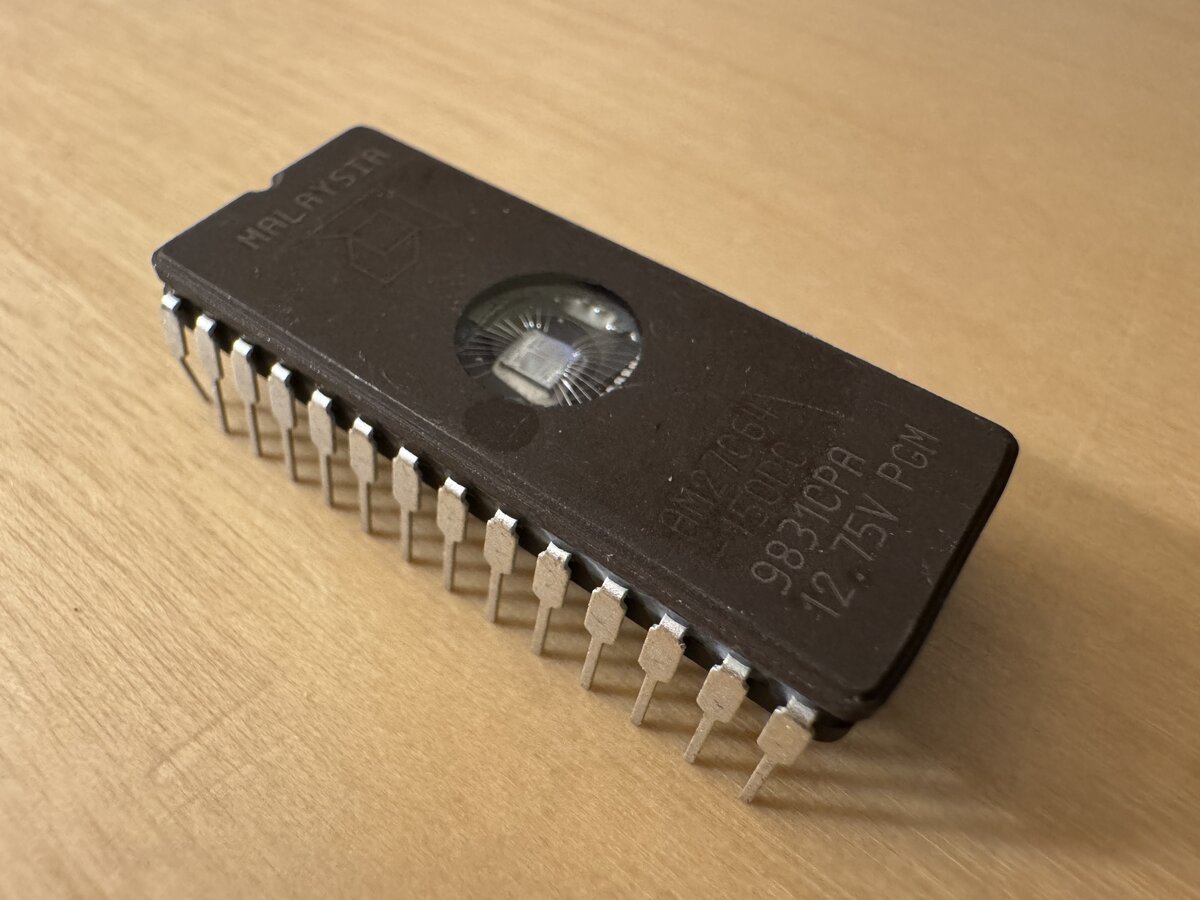
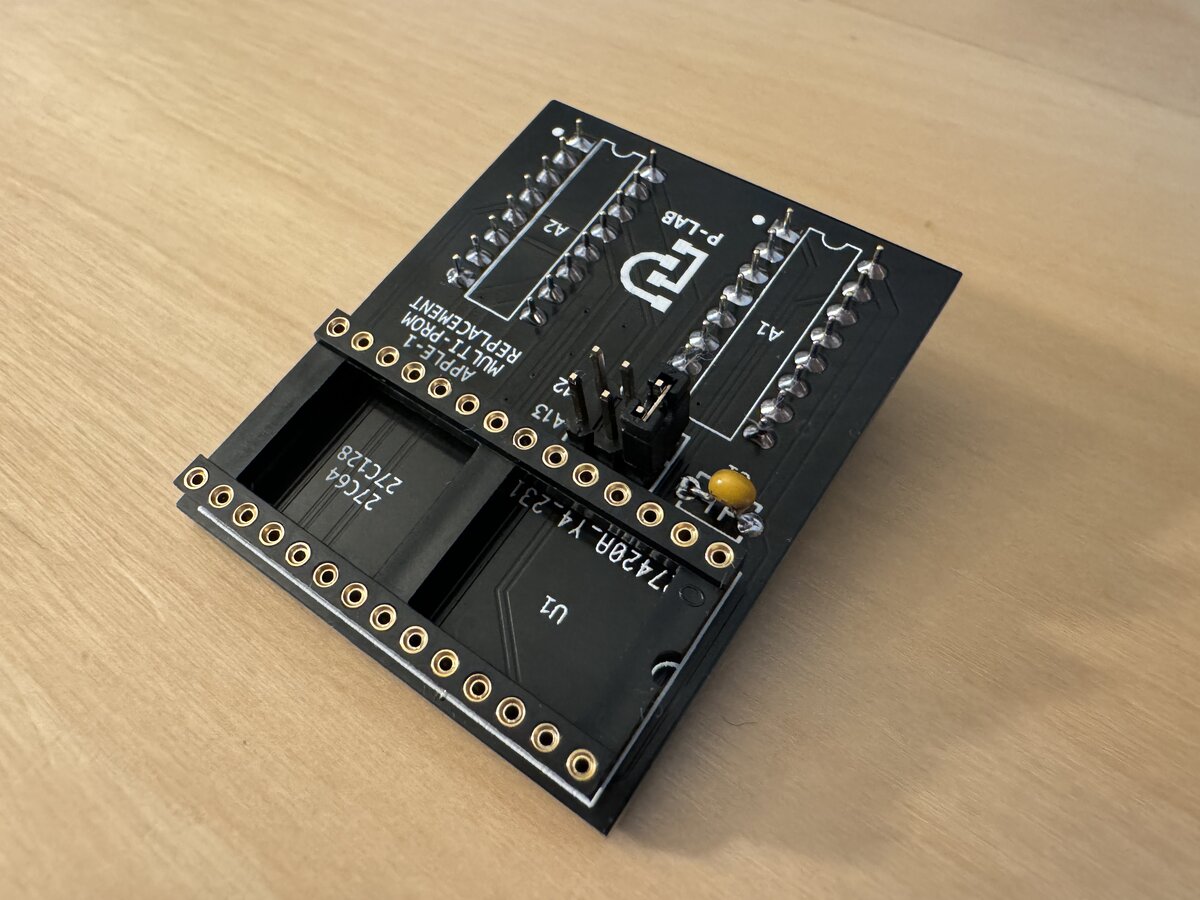
PROM blanks, as well as Apple-1-programmed PROMs, are now unobtainium, although I recently (August 2024) heard about a provider. But we can use a small daughter board made by P-LAB to use a more “modern” EPROM. However, I found that UV EPROMs are no longer current tech. They are not sold online at Mouser or DigiKey, for example. But I bought a 27C64 at Anchor (AMD-branded),7 and I will have to program it. In the future, something using an EEPROM or modern Flash could be designed.
I decided to make that daughter board black, for a change:
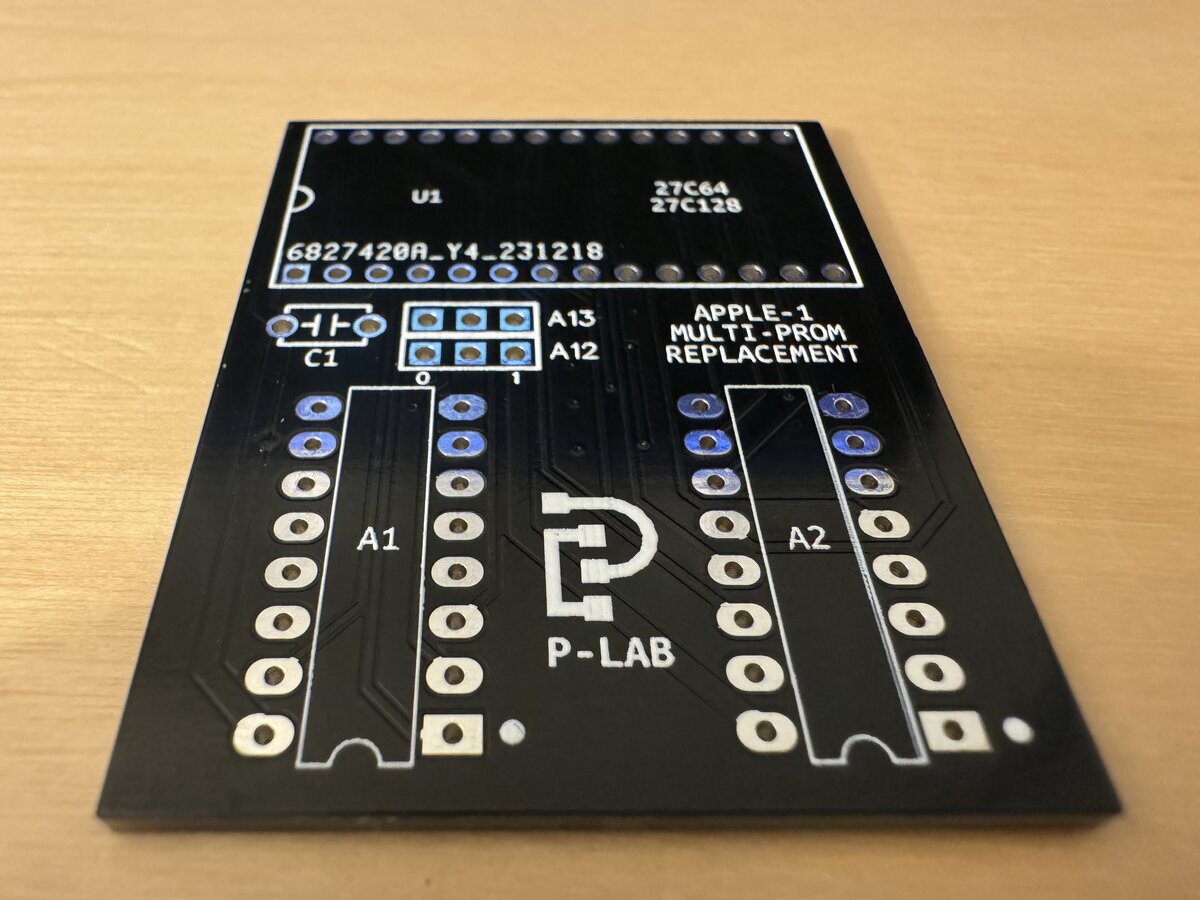
Could I do the two daughter boards, as well as the possible riser card, black? That might look cool. There is “logic” too: the chips they replace are black, so it would be a nod to that.
Here is the assembled board:
I also assembled a riser card, just in case:
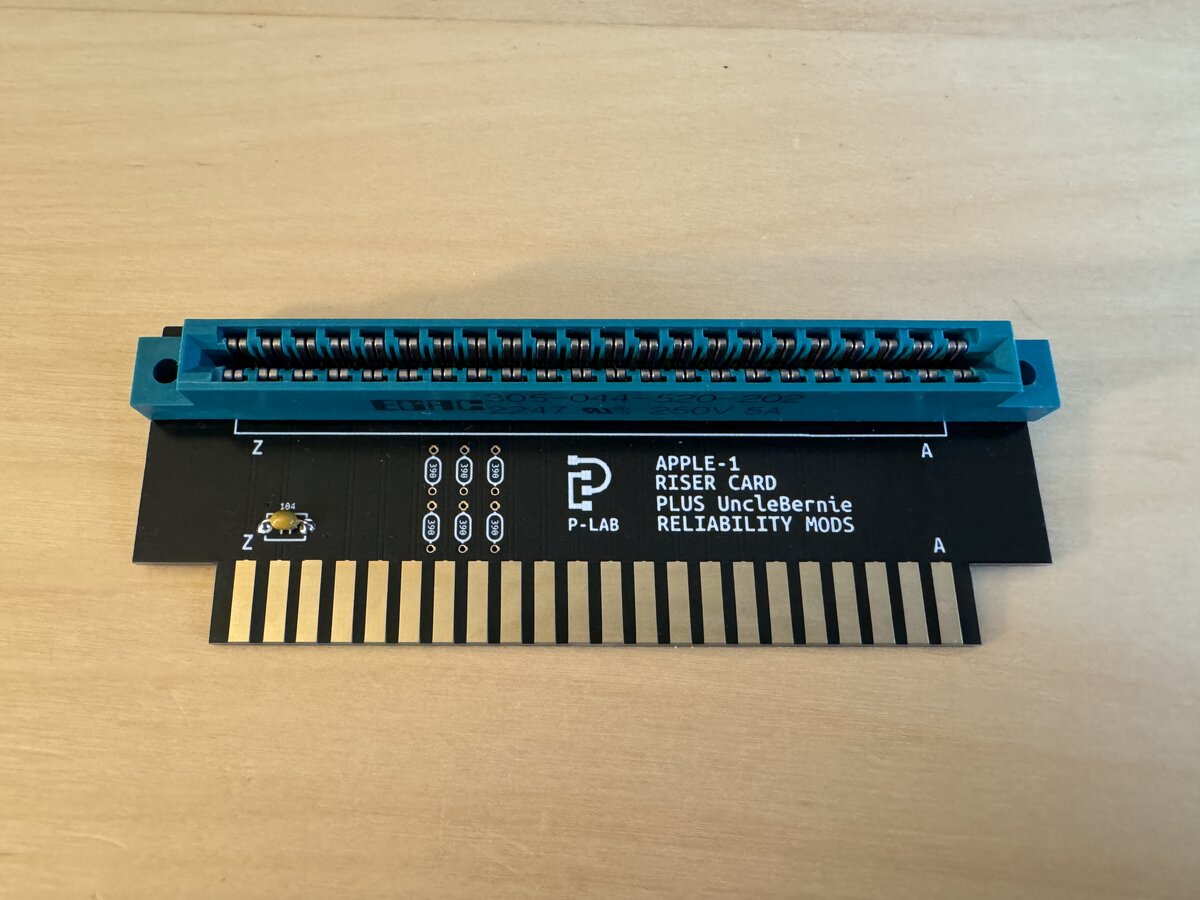
It is still missing the termination resistors, which I may or may not have to install.
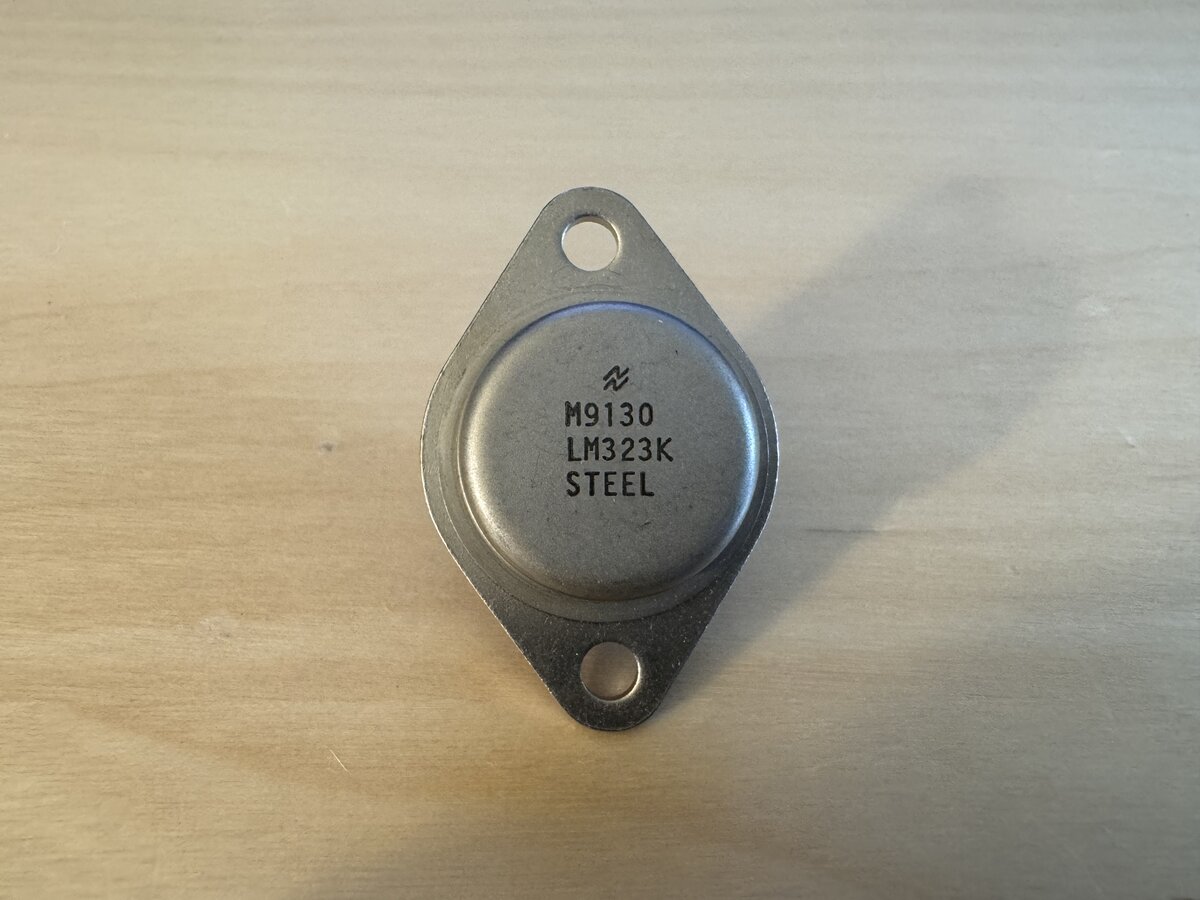
Power supply transistor
I bought the large LM323K power supply transistor on eBay.
7400-series chips
I found out about Unicorn Electronics in the Apple Fritter forums and one of the BOMs available. They still have a selection of the TTL chips in the 7400-series.8 I also ordered from them the following, which also includes some capacitors and diodes:
| Purchase details | Item | Qty | Amount |
|---|---|---|---|
| CPD.150 | CPD.150 | 20 | $3.00 |
| CPD.0150 | CPD.0150 | 10 | $1.00 |
| CPD.00150 | CPD.00150 | 2 | $0.20 |
| CPS47500 | CPS47500 | 2 | $1.18 |
| CPA2225 | CPA2225 | 6 | $1.62 |
| 74174A | 74174A | 1 | $2.99 |
| 74175A | 74175A | 1 | $2.99 |
| 74157A | 74157A | 2 | $7.98 |
| Quad 2 Input NAND Gate | 7400 | 3 | $3.87 |
| Quad 2 Input NOR Gate | 7402 | 1 | $1.79 |
| Hex Inverter | 7404 | 1 | $1.49 |
| Quad 2 Input AND Gate | 7408 | 1 | $2.49 |
| Triple 3 Input NAND Gate | 7410 | 2 | $2.98 |
| Dual Retriggerable Mono. Multivibrator | 74123 | 1 | $2.49 |
| 4 to 16 Line Decoder/Demultiplexer | 74154 | 1 | $3.49 |
| 4 Bit Decade Counter with Direct Clear | 74160 | 1 | $1.49 |
| Synchronous 4 Bit Binary Counter | 74161 | 5 | $7.45 |
| 8 Bit Shift Register | 74166 | 1 | $1.49 |
| Triple 3 Input NOR Gate | 7427 | 1 | $0.99 |
| Quad 2 Input OR Gate | 7432 | 1 | $1.79 |
| Expan. 2 Wide-2 Input AND/OR/Invert Gate | 7450 | 1 | $0.49 |
| Quad 2 Input Multiplexer (Tri-State Output) | 74S257 | 4 | $5.16 |
| High Speed Hex Buffer (Tri-State Output) | 8T97 | 2 | $3.98 |
| 50V 1A Silicon Rectifier | 1N4001 | 5 | $0.50 |
| Total | $62.90 |
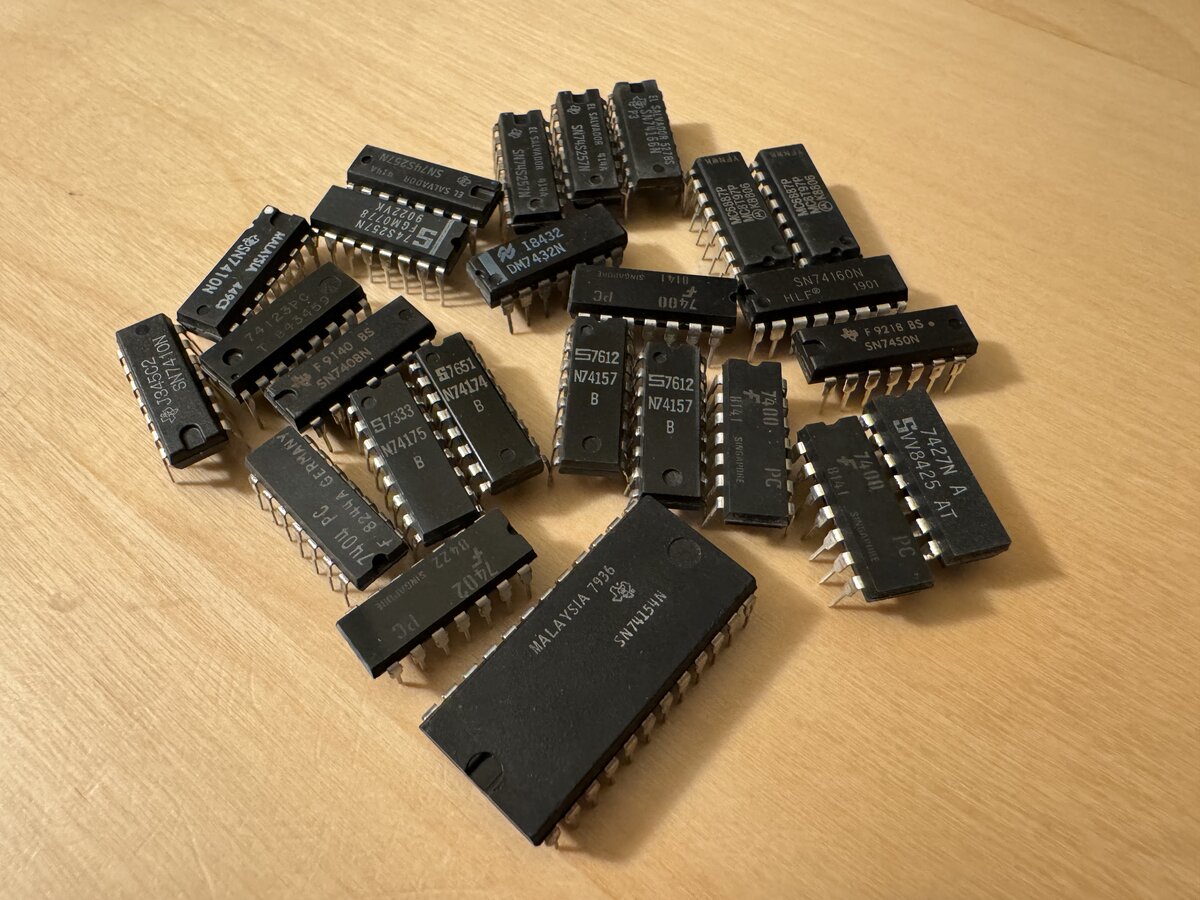
I found out that locally for me, Anchor Electronics in Santa Clara still has some of those chips as well.[^74series]
Transformers and Sprague capacitors
The transformers are also iconic parts of the Apple-1. The original ones were of the Triad or Stancor brand as recommended by Apple. The Stancor ones are harder to find, but the Triad ones are still available. I bought them on Mouser, alongside the Sprague capacitors, extension connector, power transistor radiator, and other smaller items. All in all, each of the large parts cost about $20 a piece, for a total of about $100 just there.
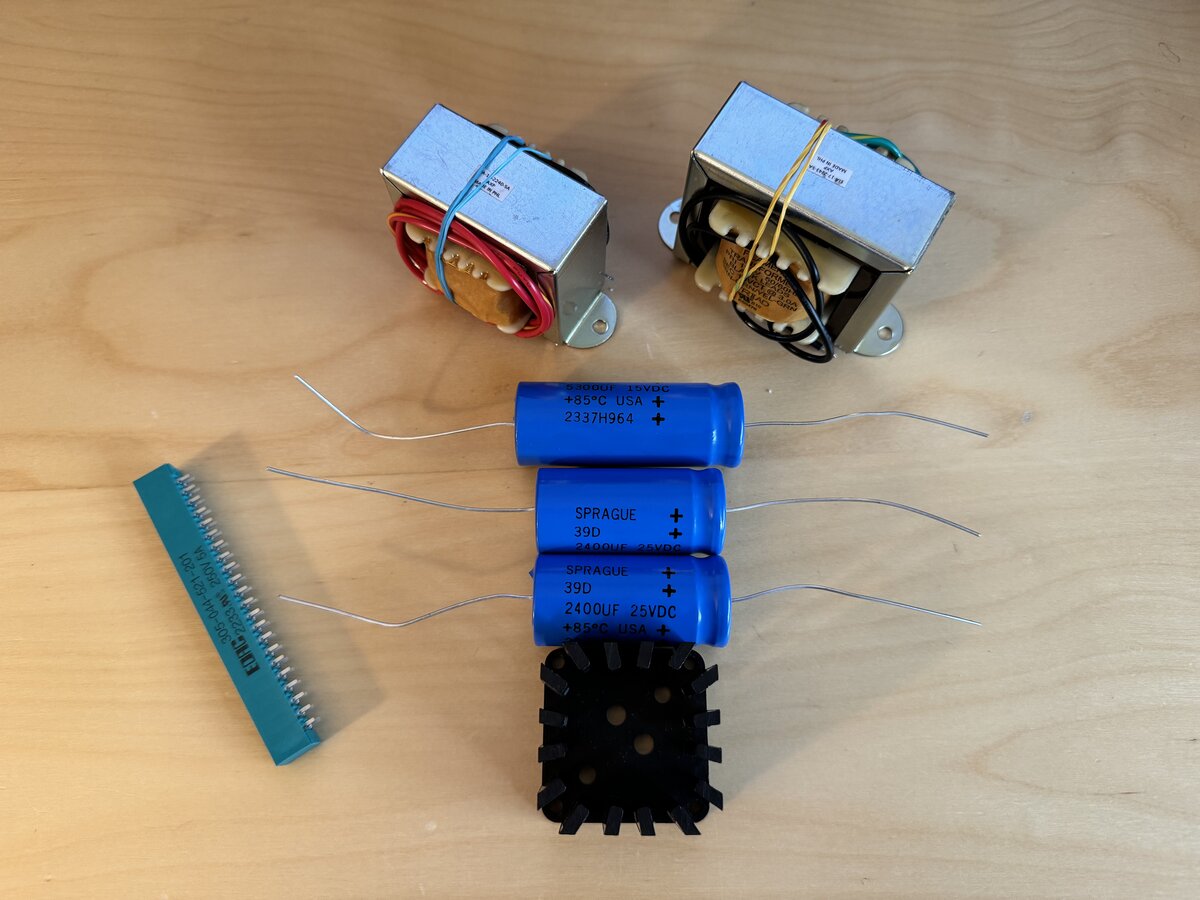
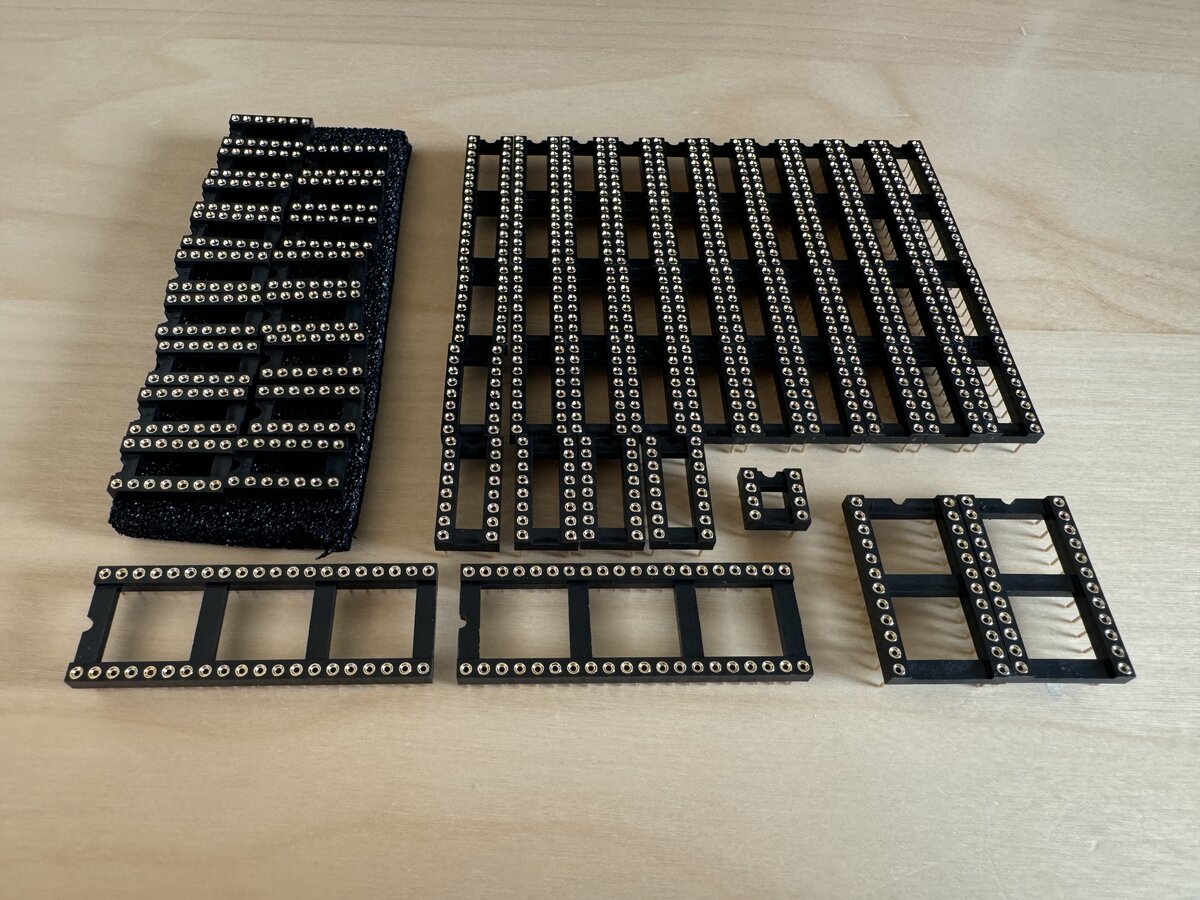
IC sockets
By almost universal agreement, the old-style 1970s sockets were not great. In fact, I saw this first hand when fixing my TVI-912 terminal. New machined sockets are better but look definitely different from the original ones. From what I see online, many Apple-1 reproductions use machined sockets and I will be in good company. But they are not cheap: I spent between $60 and $80 for the set. That’s right, just the sockets!
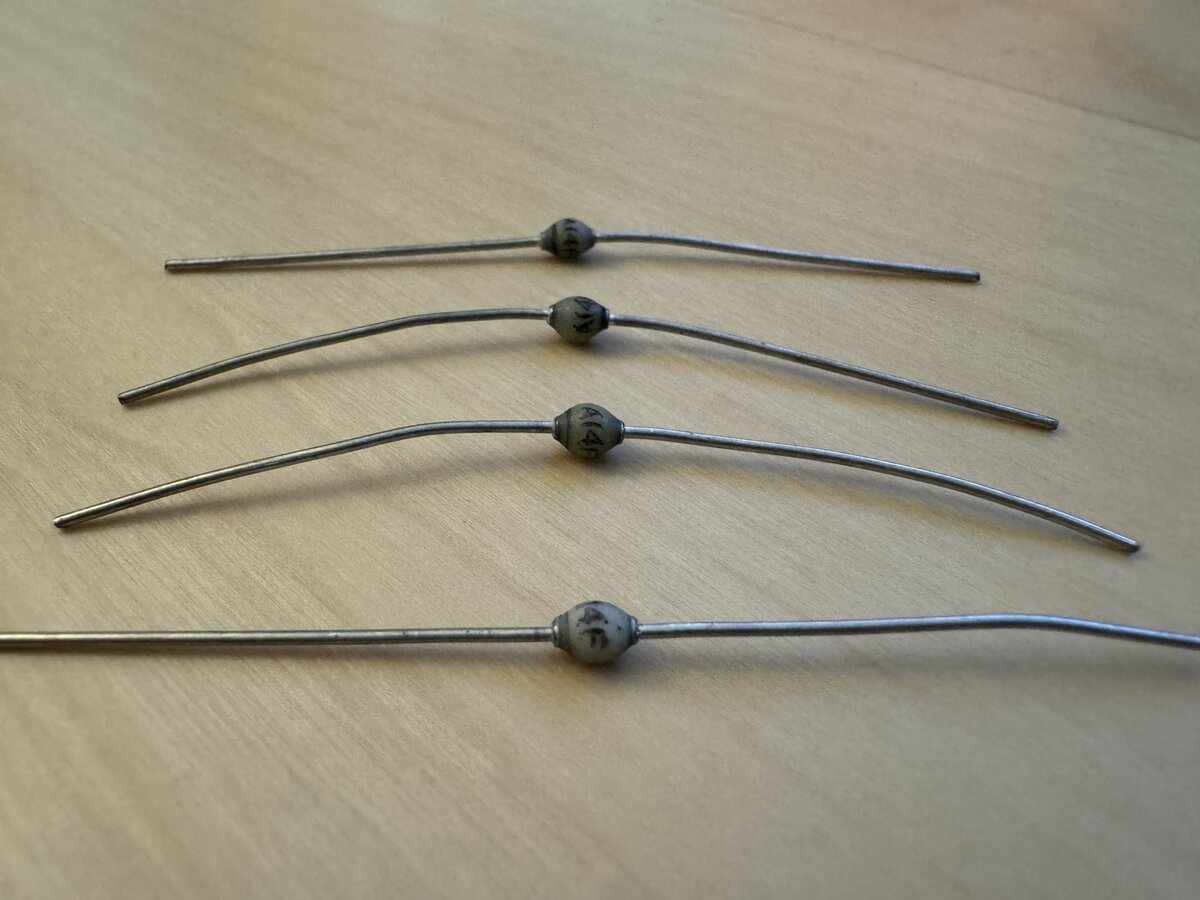
Resistors, capacitors, and diodes
It doesn’t make a difference for functionality, but passive components are also part of the look of the Apple-1. I bought some disc capacitors (Unicorn), some carbon composition resistors of the Allen Bradley brand, and the A14F sinterglass diodes (eBay).
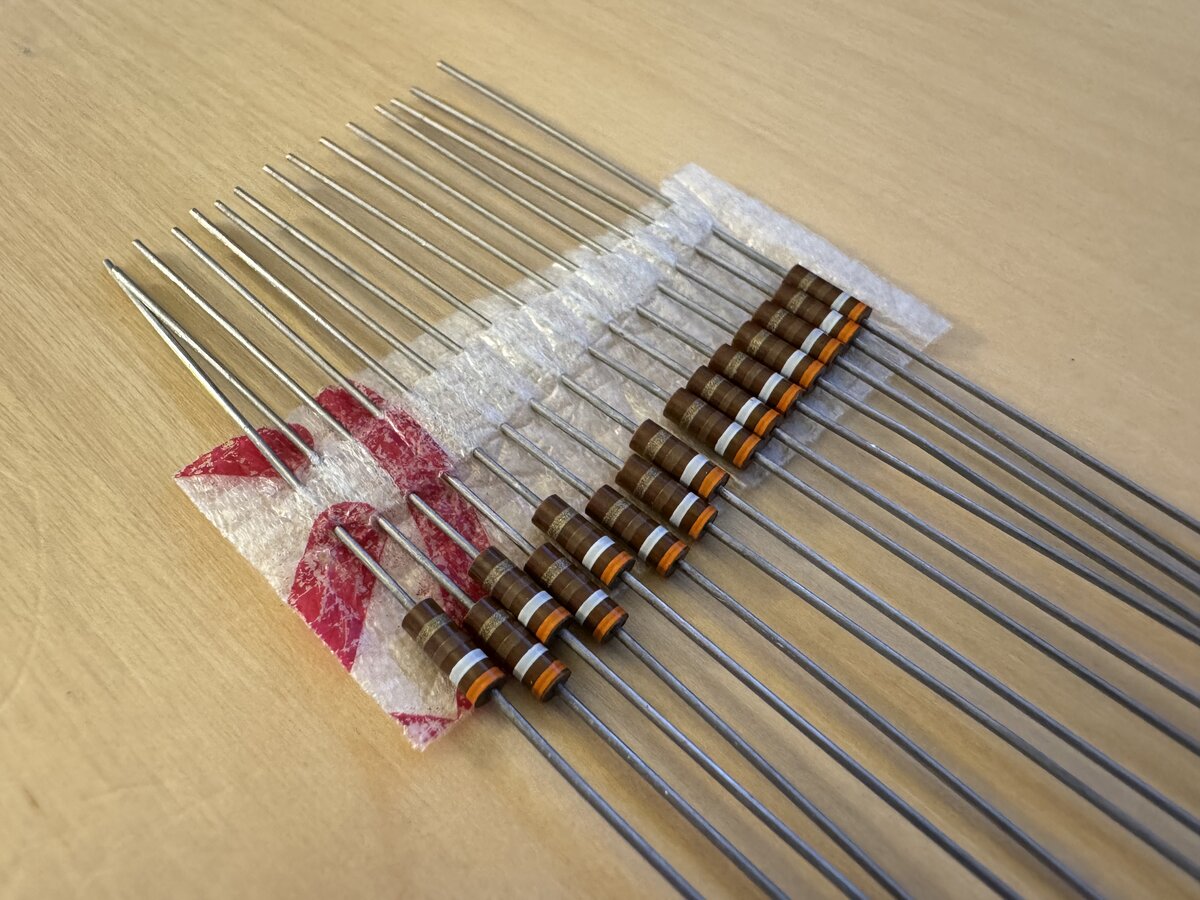
The diodes came in a pack of 50, so I will have plenty of spares. I will probably sell back most of them. I hope that they work.
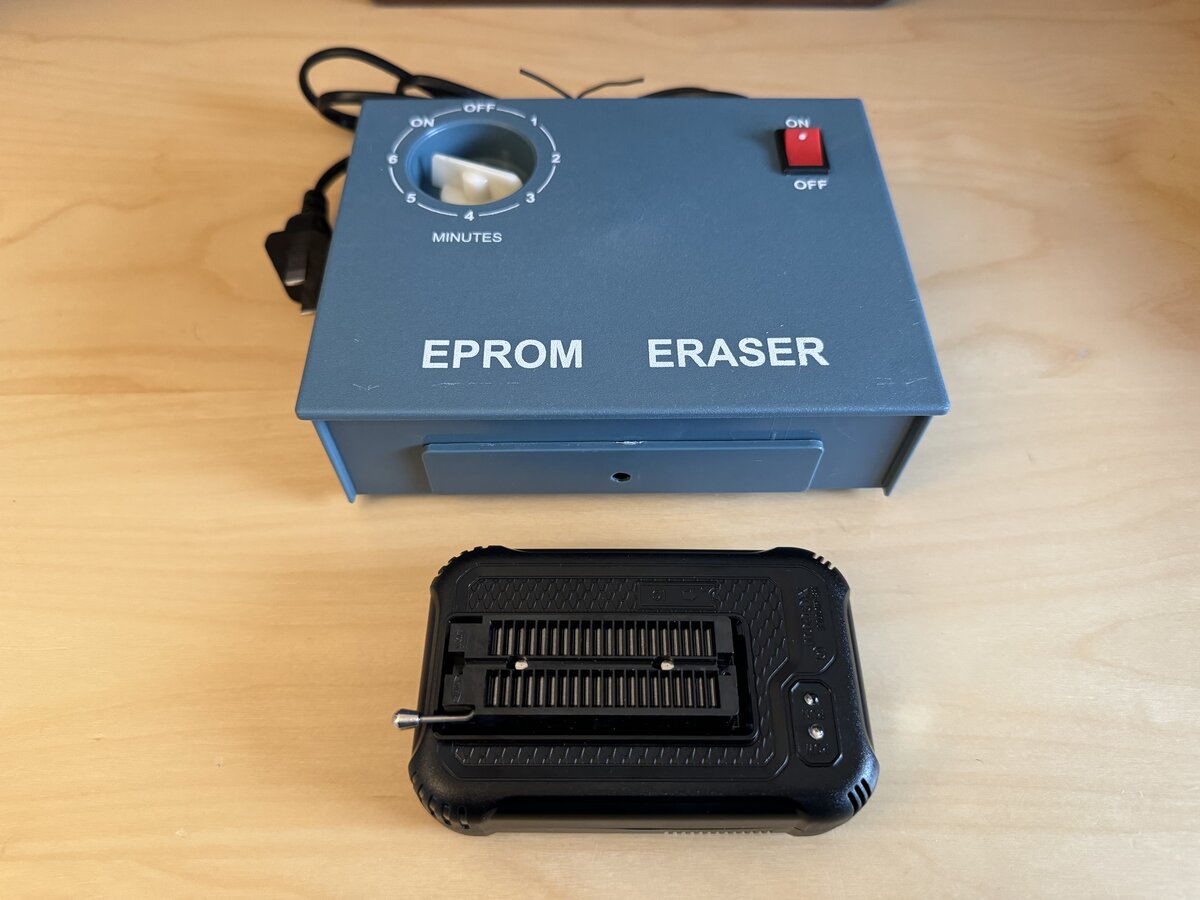
EPROM programming
When I was 19, I dreamt of having an EPROM programmer to complete a custom Z80 build. But I don’t think I actually ever used one, although a few years later, at EPFL, I programmed modern CPLDs.
But the Apple-1 either needs a PROM programmer if you can find PROM Blanks or, as is my case with the EPROM daughter board, a good old UV EPROM programmer. I did some research, got some advice, and ordered a cheap UV EPROM eraser and an “XGecu T48” programmer.
Open source software available for this programmer has just recently been made available using the minipro command. I had to compile the source code locally, as follows:
1
2
3
4
git clone https://gitlab.com/DavidGriffith/minipro.git
cd minipro
make
sudo make install
I programmed the EPROM with the following command-line:
1
minipro -p AM27C64@DIP28 -w wozmon-for-27c64-28c64-250-ns-or-better.bin
Monitor
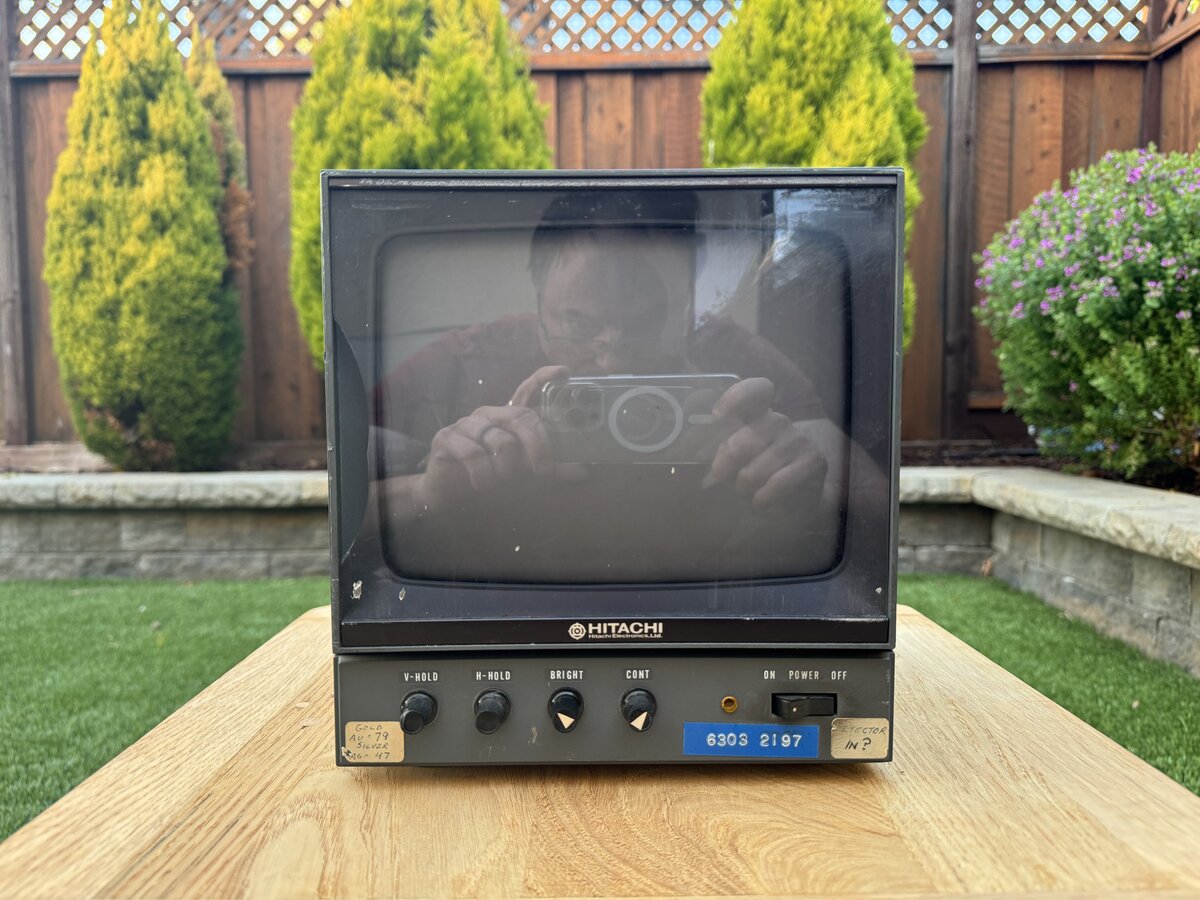
In April 2024, I found something that should work: an Hitachi monitor. There is a crack in the front plastic, but it’s not too bad. I hope that it will work: although I haven’t tested it yet, the tube appears ok and the beam briefly travels through the screen when turning it off.
Conclusion of part 1
I have now most of the parts I need to build the Apple-1 reproduction. I have also built some of the daughter boards.
Part 2 covers building the power supply.
This was quite different from the Altair, for example, which required adding separate boards for input and output, and a connection to an external terminal or teletype (unless you were happy to use the front-panel switches). ↩
The exact terminology to use is a matter of debate. Uncle Bernie prefers the term “clone”, some people use the word “replica”, and some “reproduction”. I think that the terms themselves do not help here, as all of the above terms indicate that there is intent to make a copy of something, and the degree of exactness of the copy is not obvious. For example, some non-accurate reproductions using more modern chips for part of the board but keeping the Apple-1 spirit have been called “replicas”; so-called “PC clones” from the 1980s were not exact copies of the IBM PC; etc. To be more accurate, we could describe what’s being done here as “a fairly accurate reproduction of the Apple-1 main board”. ↩
For the 2005 date, see Bryan’s Old Computers. ↩
Kits were sold by “Uncle Bernie” over the last few years, but no longer. As of writing, there are kits still listed as available from Unicorn Electronics. However, there is no proper description of the contents of that kit, or any feedback from buyers of that kit that we know of. It is not cheap either at $666.66, and all in all buying that kit would be a gamble. ↩
Update 2024-10-07: they worked, although I had initially some bad solder joints that I had to find and fix! ↩
In August 2024, I also found a series of EPROMs, so I will have some spares. I also got some Czech and Soviet EPROMs, which are not original but look cool. ↩
In April 2024, I found a lot of 7400-series chips, and I might use some of them with older date codes in the Apple-1. ↩
Comments powered by Disqus.